 2
2The ethereal zodiacal light returns to view this month. Learn how to see and photograph it with your digital camera.
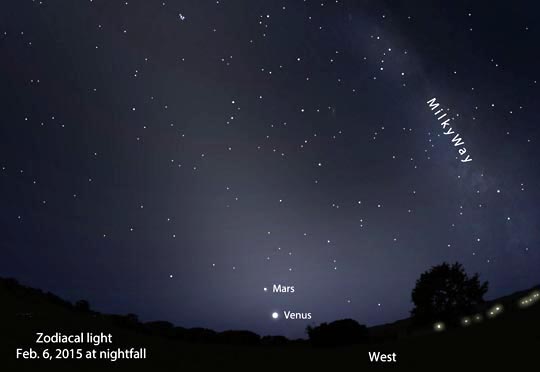
It's back! Practically a sign of spring, the zodiacal light pokes up in the western sky like a ghost awoken. Watch for it when the Moon makes itself scarce from Feb. 6th through the 20th. The viewing window begins some 90 minutes after sundown and lasts about an hour and a half.
Bob King
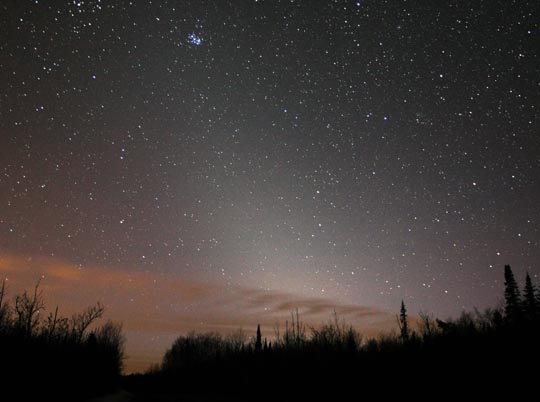
From a dark sky, the light appears in the shape a diffuse cone or wedge, brightest near the western horizon and tapering and fading the higher you go. I've traced its dimmest reaches to at least 45° altitude. From an absolutely pristine sky, the zodiacal light never ends but continues as the even fainter zodiacal band all the way into the eastern sky.
Sunlight reflecting off comet and asteroid dust concentrated in the plane of the Solar System creates the zodiacal light. Heat from the Sun vaporizes dust-laden comet ices, which expand outward to form the comet's coma. Some of the material gets blown back by the pressure of sunlight into a tail which diffuses along the comet's orbit to live a second life as the zodiacal light. Dust from asteroid collisions also contributes a significant fraction to the mix. Much of it settles in the plane of the Solar System, scattering sunlight like clouds of dust raised by running horses.
Source: Stellarium
Dust lying closer to the brilliant Sun scatters light more intensely, making the zodiacal light near the horizon brighter than that higher up. I suspect some skywatchers have at one time or another mistaken the glow of zodiacal light for city light pollution. Yes, it's that bright, especially near its base.

Illustration: Bob King
Zodiacal light takes its name from the zodiac — the band of 12 familiar constellations centered on the ecliptic, the path traveled by the Sun across the heavens during the year. The ecliptic also marks the plane of Earth's orbit around the Sun and essentially defines the plane of the Solar System where all the planets hang out.
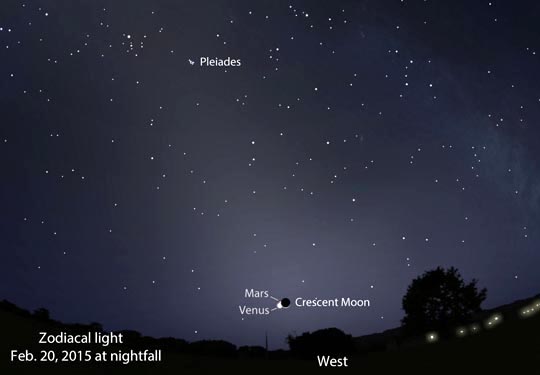
When attempting to see the zodiacal light look for something BIG. It covers a lot of celestial acreage. The best time for viewing comes near the end of evening twilight when the arch towers highest and appears brightest. The light remains visible for at least an hour after twilight's end as it slowly sinks in the west. This season, the planets Venus and Mars will linger at the base of the glow, adding a dash of picturesque beauty to the scene.
Source: Stellarium
Once you've stood awestruck before the Solar System's largest visible entity, why not preserve a few of its photons? You'll need a digital single-lens reflex camera (DSLR), wide-angle lens, and tripod for the job. A cable release to remotely activate the camera shutter is handy but not necessary. Most DLSRs can shoot exposures up to 30-seconds long, and that's all you'll need for a basic shot.
Set your lens to its maximum opening / lowest f-stop (f/2.8 is ideal) and click the switch on the barrel from A (auto) to M (manual). You want to be in manual mode to focus in the dark. Because the zodiacal light spans a lot of sky, you'll need a wide angle lens with a focal length of 14-24mm to show it best. With your lens set, let's turn to the camera body. Set the ISO or "film speed" to 1600 if you're using f/2.8, or 3200 if your maximum aperture is f/3.5.
Current DLSRs can easily produce superior, nearly noise-free images even at ISO 6400.
Now comes the fun part — focusing. Stars, clouds and the Moon all lie at infinity (that sideways "8" on the lens barrel) from the camera's point of view. For sharp images you'll need to focus your camera lens at infinity. In the old days before digital, this was easy. Just line up the "8" with the last tick mark on the barrel and you were set. Not anymore. Infinity can lie anywhere near that 8 and if you're even a little off, your stars will look like dots instead of points.
Bob King
Until recently I would autofocus on a distant cloud or the Moon in daylight and note exactly where focus tick mark lined up with infinity on the lens barrel. At night, I'd return the lens to the setting, put it in manual, clamp to the tripod and start shooting. The problem was, each lens/focal length had its own infinity focus spot. Remembering them all was a pain.
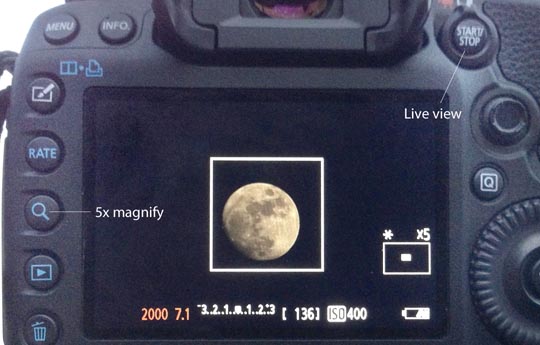
Now I use live view to guarantee sharp focus no matter what lens I use. Focusing a digital camera in darkness takes a bit of practice, but after a couple tries you'll have it nailed. Before using live view make sure your lens is set to M or manual.
Bob King
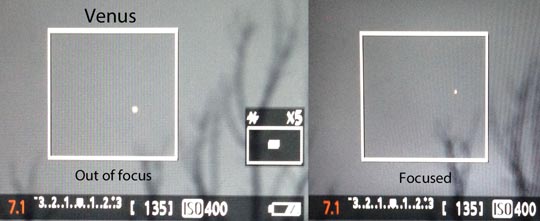
Most DLSRs have a button that displays a live view of the scene on the camera's back window or LCD monitor; consult your manual if you're not sure which button activates it. Once in live view, center the camera on a bright star, say Aldebaran or Rigel, then press the magnify button to zoom into the star. Focus the lens until the star is as tiny and sharp as possible.
That's it — you're set to go!
Now compose a scene with the zodiacal light and set your exposure to 30-seconds at f/2.8 at ISO 1600. If your camera allows, try 15-seconds at ISO 3200 or 7.5 seconds at ISO 6400. The reason I suggest a limit at 30-seconds is because longer exposures will begin to show more pronounced star trails. A half-minute's a nice compromise. As always, check the monitor to make sure you're in the ballpark for correct exposure. If not, adjust accordingly.
If you follow this procedure, I can almost guarantee you'll come back from your zodiacal light expedition with both the joy of seeing the phenomenon and a means for sharing your experience.


Comments
halfastro
February 4, 2015 at 3:44 pm
I shot the Zodiacal light and the winter Milky Way with a wide angle lens from Kitt Peak recently. Even Comet Lovejoy shots up near the top of the photo.
https://www.flickr.com/photos/halfastro/16136471450/
You must be logged in to post a comment.
Bob KingPost Author
February 8, 2015 at 1:32 pm
Robert,
That's a beautiful image. I always enjoy photos that depict the zodiacal light and what helps to create it - comets.
You must be logged in to post a comment.
You must be logged in to post a comment.