 2
2Knowing your astrophotography setup's pixel scale will help you take better pictures. And to determine pixel scale, you first need to know your field of view.
Last month, we looked at the difference between seeing and transparency in astronomical imaging, and I promised to relate seeing to pixel scale this month. I’ve learned my first lesson of writing a monthly blog; don’t make promises about next month! So, right after making that rule, I’m going to break it and say next month I’ll do that… again. Yes, I just did that.
Relating pixel scale to seeing is really more about sampling theory, and I have quite a bit to say about that. Before I do however, I need to lay some further foundations (see what I did there), so first I’m going to talk about your field of view, and use that to lead into pixel scale.
Field of View
When you attach a camera to a lens or a telescope, it sees a fixed area of the sky that is determined by the focal length of your lens's optic and the size of your camera's imaging chip. Longer focal length instruments shrink the area of sky you see due to the greater magnification; shorter focal lengths widen up the area. By the same token, smaller imaging chips restrict the field, while larger sensors provide wider fields of view. Focal length and sensor size work together to determine the exact area of sky you can image.
If you know the width of your imaging chip and focal length of your optic in millimeters, you can compute the field of view yourself:
Field of view in arc minutes = (width of chip * 3460) / (focal length of optic)
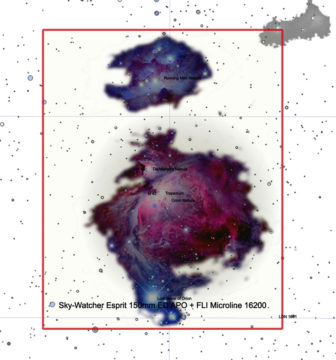
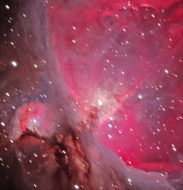
Some planetarium and imaging software programs will calculate your field of view by allowing you to select from a list of common telescopes and cameras (they will also compute your pixel scale for you directly). For my example setup shown at right, I have an imaging chip that is 27-mm wide, on a 1,050-mm focal length refractor. Working out the math with the formula above yields:
(27 * 3460) / 1050 = 89 arcminutes wide
This information is useful because now I can plan my imaging project knowing that both M42 and the Running Man nebula (NGC 1973, 1975, and 1977) will fit nicely in my frame.
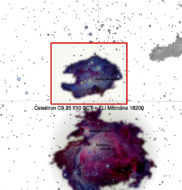
Increasing the focal length shrinks our field of view. Here, we keep the same camera, but increase the focal length by almost 3 times with a different telescope. This combination reduces our field of view by about a third. It won't contain the entire M42 nebula, but perhaps the Running Man might make a better subject.
Focal length isn't the only player on the field, either. Smaller imaging chips further restrict the field of view, while larger sensors increase it. Taking this the other direction, we can get a larger/wider field of view by either getting a camera with a larger sensor, or a telescope with a shorter focal length.
Almost any field of view can be obtained for a given focal length by selecting different sensor sizes, or vice-a-versa for a given sensor by using different focal lengths.
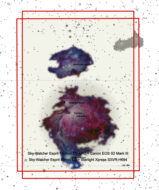
At right are two nearly identical fields of view overlaid: One was taken with a 1,050-mm focal length optic and the other with a very short 400-mm focal length optic.
So why are they so similar? Because the long focal length optic has a very large imaging chip, and the short optic has a very small one. Math is wonderful isn’t it?
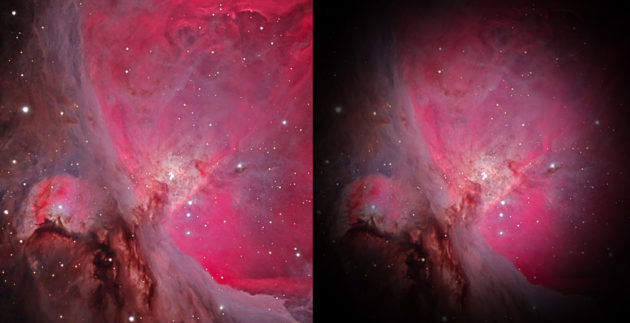
So, I said almost. The limit on this mathematical sleight of hand is how large an image circle your optic can deliver. If you try and pair a large sensor with an optic that can't cover it (or perhaps try to expand the field with a powerful focal reducer), you’ll get something like the image below in the right panel. Flat field calibration (yet another future topic) will help mitigate this, but you just can’t correct an image if there is not enough light falling where you need it!
This is why anytime you talk to a salesman about buying an astronomical camera, the first question they should be asking you is what kind of telescope you have.
Pixel Scale
Finally, returning to pixel scale . . . now that we've covered field of view, and you know how to calculate it, there's just one more math problem to get the pixel scale of your system. Simply divide the width of your field of view by the number of pixels across the camera sensor.
In my previous example, my field of view is 89 arcminutes wide. This particular sensor has 4,540 pixels across horizontally. This means each pixel covers an area of sky (89 / 4540) arcminutes wide, 0.0197 arcminutes, or 1.18 arc seconds per pixel. (Multiply arcminutes by 60 to get arcseconds).
So now we know what our pixel scale is; why do we care? Because many metrics for an imaging systems' performance are also measured in arcseconds. Take for example, periodic error.
If your mount has a periodic error of say 5 arcseconds, this means that over the course of a few minutes, instead of tracking smoothly with the stars, the mount essentially wobbles back and forth by about 5 arcseconds in right ascension. If your image scale is about 1 arcsecond per pixel, what do you think is going to happen? That’s right, all of your stars are going to be 5 pixel-long streaks, and details in the image are going to blur by the same amount.
On the other hand, if you're shooting with a short camera lens on a DSLR, and your pixel scale is, say, 15 arcseconds per pixel, then the periodic error is much smaller than a single pixel. The wobble isn't going to have any visible effects on your image.
Any mount is a good mount given the limits of pixel scale and the length of a single exposure — including camera tripods, which don’t track at all!
Ever hear of the rule of 600? This rule of thumb states how long you can image on a tripod before stars appear elongated. If you divide 600 by the focal length of your lens, this is the number of seconds you can expose before stars start to appear trailed. What this rule is really about is the length of time it takes before the image of a star moves from one pixel to the next. This is determined only by where you are looking in the sky (the closer you look toward the poles, the slower the stars appear to move) and by your pixel scale.

Richard S. Wright Jr..
Cameras with tiny pixels need to hedge their bets a little, and cameras with large pixels can push this limit a little bit. In fact, the 600 rule is often scaled back for crop sensor cameras. The reason often given is the crop factor of the lens on the smaller sensor. But the true reason is that most crop sensor cameras have correspondingly smaller pixels than their full-frame counterparts. I’ve even seen this reduced to the rule of 500 for newer higher-megapixel cameras, for some reason. Yes, and now you know the reason too.
How accurately you have to be polar-aligned, the effects of refraction, and flexure (bending) within your optical train are all constrained by your setup's pixel scale. The larger your pixel scale, the more forgiving everything else becomes. One of the most common recommendations for a beginner is to use a short, fast optic when getting started. Why? Because they deliver a lot of light very quickly to a large pixel scale (assuming your camera doesn't have ridiculously small pixels).
Now, pixel scale and seeing also both work together either for you or against you. Next month, I promise this time, that will be the topic.

Comments
Martian-Bachelor
May 31, 2018 at 12:28 pm
One thing worth mentioning is that with a color DSLR you have a Bayer array sensor where each pixel only records one of the three colors (R or G or B). Upon readout the camera's CPU calculates the other two color values for each pixel. So, yes, two-thirds of the data in your image file is synthesized.
Depending on how this is done the theoretical resolution for an ideal point source is at best 1½ pixels. So whatever your pixel size calculates out to you may want to add 50% to it if you're using a DSLR color sensor.
The other thing worth mentioning is that mass produced commercial lenses for such cameras aren't capable of pixel or even pixel-and-a-half resolution. Even with excellent focus and good seeing you likely won't see bright but not saturated star images get any smaller than ~3 (or 4) pixels across. This is based on my experience using cameras with ~6 micron pixels. The number of pixels across will be proportionally higher for smaller pixels -- which the manufacturers like because they up the MegaPixel count.
The other useful way to think about this is the number of line pairs per millimeter the lens/sensor combo is capable of resolving. Lots of great photography has been done in the 50-60 lp/mm regime, and during the days when Ansel Adams was shooting large format sheet film it was more like 25-40 lp/mm. (Large format lenses made c.2000 were good enough they could show detail on the ground glass that was beyond what the film was capable of recording.) 3½ pixel diameter stars with 6 micron pixels works out to about 50 per mm. Optics that can do 50% more than this (or more) tend to be very pricey.
You must be logged in to post a comment.
John-Murrell
June 14, 2021 at 6:32 am
There is a diffusing filter in front of the chip to ensure that a point source covers at least four pixels and to reduce Moire fringing. It used to be a simple diffuser but now is much more complicated with different performance in the horizontal & vertical directions.
You must be logged in to post a comment.
You must be logged in to post a comment.