 7
7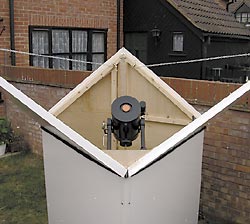
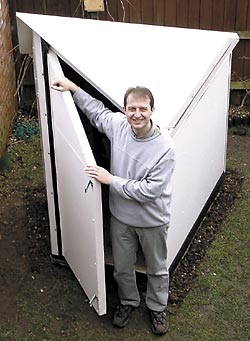
Courtesy Adrian Ashford
What is it? When a neighbor starts building a pyramid-like structure in his or her back garden, it's bound to generate a great deal of speculation. Idle curiosity soon gives way to concern when it's noted that the pyramid builder is seen to make apparently furtive visits to the edifice only at night. Furthermore, the roof of this enigmatic building actually opens under the stars, though what it contains is enveloped in shadow punctuated by occasional dim red glows. Welcome to my back-garden observatory!
The advantages of having one's own observatory are as compelling as they are well known — the telescope can remain set up and ready to go at a moment's notice and is usually near thermal equilibrium, to say nothing of the relief of not having to lug a hefty instrument from the house into the yard. Added together, these attributes make it possible to take advantage of brief observing opportunities whenever they arrive — an especially attractive state of affairs when one lives in a region where clear skies are at a premium (such as the United Kingdom) and every viewing minute is precious.
I found myself in a situation that many readers can appreciate. I owned a quality 8-inch Schmidt-Cassegrain telescope and lived in rented accommodations with a tiny garden that offered a wonderful view of the meridian and a sky almost free of artificial lights. My landlord was a very amenable guy, but I knew that even he would balk at the sudden appearance of a conventional observatory dome on his property.
This situation called for a compact, unobtrusive design that would lend itself well to disassembly and relocation elsewhere. (In fact, the structure has been relocated, to northern Wales, since this article first appeared in Sky & Telescope's May 2003 issue.) I wanted something that looked good, would be easy to build with ordinary tools (I possess only a drill, jigsaw, and collapsible workbench), and required a minimum of materials. At the same time it would have to be spacious enough for me, the telescope, and any charts and observing accessories I might wish. Fortunately, I was able to satisfy all these demands with the observatory design presented here.
Making Plans
I'm predominantly a lunar and planetary observer. My quarry are best viewed when they lie to the south, and as a result 90 percent of the time I sit north of the telescope. When my scope is polar aligned, the tripod feet naturally form an equilateral triangle on the ground. I reasoned that if the observatory were to be aligned with the meridian and two sides of the structure were to meet at an angle of 60° pointing due south, then the southern tripod leg could fit neatly into the apex with a minimum of wasted volume. Once I hit upon this notion the rest came rather quickly, and I settled upon the kite-shaped floor plan shown below.

A round of calculations revealed that I could build the four sides of the observatory from just two 4-by-8-foot sheets of 3/8-inch-thick plywood. A third sheet of plywood would suffice for the roof and back panels. The plywood needed to be firmly attached to a rigid framework, which was built using 18 pieces of 7-foot-long, 2-by-2-inch pine stock. For additional internal bracing of the structure (particularly at the southern apex) I bought a sheet of ½-inch-thick plywood measuring 3½ by 2 feet. (Editor's note: One foot equals 305 mm and one inch equals 25.4 mm.)
Bearing in mind that my observatory would have to be disassembled when it came time to move it, I chose to bolt it all together, and as a result, I purchased a considerable number of zinc-plated carriage bolts, washers, and nuts. However, there's no reason why you couldn't use 1¾-inch zinc-plated or brass screws for assembly. In addition to this hardware, count on using at least a half dozen right-angle braces to strengthen corner joints.
Getting a Firm Foundation
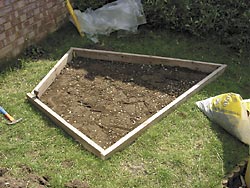
Before any woodworking can be done, you have to lay the observatory's concrete foundation. Preparation of the site is critical — take time and great care when marking where the foundation slab will be sited. Recall that the outline is kite-shaped and has a north-south axis 5 feet 10 inches long and an east-west axis measuring 5 feet 2 inches.
To ensure that the long axis of the building is aimed north-south, you must define your observatory's meridian line. The most accurate method is to use a computer program to predict the instant of local apparent noon: when the Sun will be due south on a particular date. At that time you can use the shadow cast by a thick plumb line (for easy definition) onto a sheet on the ground to mark a very accurate north-south line. You will have to work quickly and methodically, since an error of four minutes of time will equate to a displacement of approximately 1° in azimuth on the ground.
Courtesy Adrian Ashford
String taut lines between posts defining the north-south and east-west axes of the structure, and then outline the area. Remove the topsoil where the foundation will sit. Then, as a final step, take time to use an impactor (either hand or machine) to make a solid base for the concrete. Once this is done you are ready to form the concrete mold for the structure's foundation with planks and stakes. As you do so, use a spirit level to periodically check that all four sides are level with the ground.
My concrete slab has a floor area of less than 15 square feet. Since I wanted it to be 4 inches thick, I calculated that I would need 5 cubic feet of concrete to complete the job. Before pouring, it's very important to cover the area with a sheet of plastic to act as a damp course membrane. Use a long, straight edge of timber to tamp down the wet cement, which should be allowed to dry for at least three days. If you don't want to mess with mixing and pouring concrete yourself, this part of the project can be contracted out to a local builder.
Courtesy Adrian Ashford
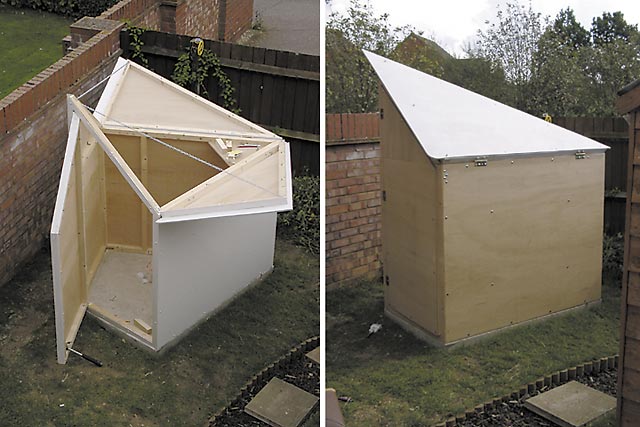
Taking Shape
I found it was best to start construction with the two longest plywood side panels. Each is braced top and bottom by 61-inch-long pieces of 2-by-2-inch wood, mitered at each end. My preference was to bolt the timbers to the plywood at approximately 2-foot intervals, but 1¾-inch galvanized wood screws would work just as well. The side panels are further strengthened by two vertical braces formed by 44½-inch lengths of timber positioned 16 inches inside either edge.
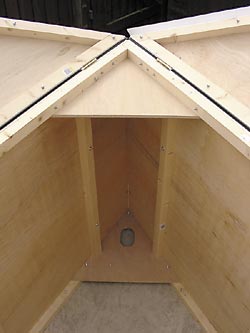
The side panels are joined at the southern apex by two equilateral triangles top and bottom, made from ½-inch-thick plywood. Each will measure 24.6 inches on a side and will ensure the side panels meet at exactly 60°. Prior to assembly, ensure that the lower triangle has a 3-by-6-inch slot cut in its center to accommodate the southern tripod leg.
The panels are attached to the concrete with masonry bolts drilled through the timbers at 16-inch intervals. Before tightening things down, it's important to place strips of plastic sheet between the wood and the concrete to prevent moisture from creeping into the edges of the timbers.
Courtesy Adrian Ashford
The same care and attention to mitered joints is applied to the north-facing panels, with the added complication of having a door to one side. Using the 29-by-48-inch off-cut from the sheet used for the roof panels, cut a 25.2-by-34-inch rectangle, which you cut in two along a diagonal. The two resulting right-angle triangles form the upper sections of the rear panels. Note that the twin 73-inch-long, 2-by-2-inch frame uprights at the northern apex may be joined at the corner where they meet with a vertical strip of plywood or some surplus hinges, the latter giving a neater joint.
I constructed the door frame within the surrounding rear panel frame (a frame within a frame), allowing a ¼-inch gap between them. Then I used a jigsaw to carefully cut the plywood within this gap to separate the door and its enclosing frame. The resulting door was easy to hang exactly with three butt hinges. Note that the top apex of the door has to be chamfered in order for the door to open within the frame.

Courtesy Adrian Ashford
Hitting the Roof
The roof consists of a pair of gull-winged doors, each hinged to the top edge of the side panels. (Bear in mind that when these doors are opened they will need about 4 feet of clearance on the east and west sides of the structure.) These roof doors are from a 67-by-48-inch plywood panel cut diagonally with a jigsaw. This is a long cut (nearly 7 feet!) and has to be as straight as you can make it, so you should lightly tack a straight length of wood to the plywood to guide your saw.
The framework for each gull-wing door takes the form of a right triangle constructed from the 2-inch-by-2-inch timber. The sides of this triangle should measure 43.8 by 61.0 by 75.1 inches. The 61-inch-long side mates with the edge of the side panel and is attached with three 4-inch galvanized or brass hinges.
When you attach the plywood to the frame, the hypotenuse edge of the plywood should extend about an inch beyond the frame so that when the doors are closed the frames touch at the inside edges and the plywood mates at the external edge (as shown in the diagram on Section 2 of this article).
Courtesy Adrian Ashford
To make a watertight seal, I used a length of flexible white 2-by-2-inch PVC channel secured to the side of one roof door to prevent leaks. I used similar sections of white PVC channel (secured with small brass screws) to seal the southern apex, and the right angles where the rear panels meet the side panels. All hinged sections were covered with a 4-inch-wide rubberized flexible membrane, similar to that used in the damp courses (moisture barriers) of brick walls, but a strip of thick PVC plastic would also suffice. Additional water sealing at the bases of the rear and side panels where they join the concrete was supplied by a self-adhesive, 6-inch-wide rubber strip similar to duct tape, faced on the exterior side with aluminized plastic. This permits rainwater to run down the sides and over the concrete without seeping into the wood-concrete interface.
The last stage in construction is to make sure every wood surface is protected from the elements. All exterior faces were painted with primer and two coats of gloss white oil-based paint. Instead of painting the interior matte black, I enhanced the natural wood grain by darkening it with a combination of preservative and stain.
Opening my observatory for a night of stargazing is quick and simple, and it has fulfilled all my hopes and desires. There's very little I would change if I were to build it again. The dimensions are very easy to scale up to accommodate larger Schmidt-Cassegrain and Maksutov-Cassegrain scopes. Observers living in damp climates should consider installing vents to prevent moisture from building up inside the observatory.

Comments
supplyimaging
February 3, 2018 at 3:57 am
I have been looking at building a telescope observatory for a while. Out of all the designs that are around this is the first one that seems to be right. It could be called a radically different design or just a simple design and it is compared to all the other ideas published on the web. I will be building a similar design soon. Thanks for changing my ideas of what a telescope observatory should look like!
You must be logged in to post a comment.
ashepps
April 29, 2020 at 7:04 am
Hi,
I am going to make a modest observatory. Can I get the plans on this one, willing to pay.
Thanks - Alan Sheppard
[email protected]
You must be logged in to post a comment.
OneNewBeat
May 14, 2020 at 8:43 am
Me too, please.
You must be logged in to post a comment.
OneNewBeat
May 14, 2020 at 8:45 am
[email protected] same thing ashepps said. I'm willing to pay as well.
Kindest regards,
Irene Rovene
You must be logged in to post a comment.
OneNewBeat
June 9, 2020 at 8:57 am
How did it come out? Or have you started building it?
You must be logged in to post a comment.
ivorlee88
October 28, 2020 at 5:22 pm
Hi,
Did anyone actually pay and got the plan and built one? I am also planning to do the same.
Cheers,
Ivor
You must be logged in to post a comment.
mcgercam
January 10, 2021 at 11:30 am
I too would like the plans and to scale up to a 10inch SC.
Thanks,
[email protected]
You must be logged in to post a comment.
You must be logged in to post a comment.