 0
0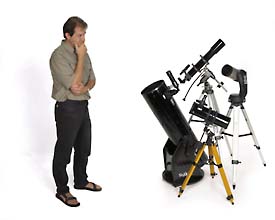
Sky & Telescope / Craig Michael Utter
Once you've obtained an astronomical telescope, what can you expect of it?
Both less and more than many new owners realize.
One of the fun parts of being an amateur astronomer is showing off the heavens to others. The "oohs" and "aahs" as people get their first good look at the Moon or Saturn are a pleasant reward for the proud telescope owner. Naturally, you will have aimed the scope at the most spectacular object above the horizon. Sometimes there's a temptation to show people more typical objects — ghostly, barely visible apparitions with obscure catalog numbers — "to give them an idea of real astronomy." The reactions then are not so encouraging, even when viewers are told they're looking at a recently recovered comet or a galaxy 50 million light-years away.
The truth is, most of the thousands of objects visible in amateur instruments are not the least bit spectacular. Anyone who gets a telescope expecting dramatic visual thrills is in the wrong hobby.
The riches that astronomy offers are of a different sort. Visual observing outdoors in the dark usually means working to detect something that's extremely faint, tiny, hard to find, or all three. The more difficult the task, however, the greater the rewards of success. The excitement lies in finding and seeing, first-hand, remote marvels far beyond our planet — and in gaining skills and knowledge as an amateur scientist.
Too many people buy a telescope as if it were a TV, expecting it to show pictures all by itself. It's more like a piano, which gives back only as much value as the work you put into it. Learning to use a telescope well is a whole lot easier than learning a musical instrument, however. If you practice the techniques described here, you'll soon master the skies.
Know Your Equipment
Naturally, everyone first tries out a new telescope in the daytime. This is when to become familiar with its motions, pointing, focusing, different eyepieces, and magnifying powers, so you can then do everything in the dark. Here are some things you'll want to get straight in daylight before taking your telescope out under the night:
The Finder. Most telescopes have a finderscope attached to the side to help aim it. You need a finder because the main telescope has such a tiny field of view — that is, it shows such a tiny piece of sky — that you can't tell exactly where it's pointed just by looking. The higher the power of your main telescope, the smaller the field of view. For example, at 50 power you're looking at a magnified piece of sky about as small as your little fingernail covers when held at arm's length. Pretty tiny!
Sky & Telescope / Craig Michael Utter
An 8× finderscope, by contrast, displays about as much sky as a golf ball covers at arm's length. This is big enough so you can aim at something you see with the naked eye and get it in the finderscope's view. Once it's there, you center it in the finder's crosshairs. That should be a precise enough aim for the object to appear in the view of the main telescope.
First things first: you'll need to adjust the finder's alignment screws so it gets aimed parallel to the main telescope. In daylight, point the main scope at something at least several hundred feet away using the lowest-power eyepiece. (But not the Sun! Never look through a telescope that might get aimed at the Sun or you could blind yourself.) A distant treetop is ideal. Center it in your view. Never mind if it appears upside down.
Now look in the finder. See the treetop? Is it centered in the crosshairs? Adjust the screws holding the finder until the crosshairs line up on the target. Now check back in the main telescope to make sure it hasn't moved. Then switch to a high-power eyepiece in the main telescope, and repeat the operation until the finder is locked in position with perfect aim.
And why, you ask, is the treetop upside down or oriented at some other weird angle? The answer is that this is an astronomical telescope, and after all, there's no up or down in space. So it doesn't matter how the field is oriented. Turning the image right-side up would require extra optical parts, adding to the instrument's expense and possibly degrading its performance. ("Image erecting" lenses are best used in terrestrial telescopes: those intended for looking at things on Earth in daytime, when there's no shortage of light.)
The Mount. As noted in the article "Choosing Your First Telescope," telescope mounts come in two basic types: equatorial and altazimuth.
An equatorial mount allows the telescope to swing only in the directions of celestial north-south and east-west. An altazimuth goes up-down (moving in altitude) and side to side (azimuth). The altazimuth mount has the virtue of simplicity. An equatorial mount is ultimately more helpful, but it takes some getting used to.
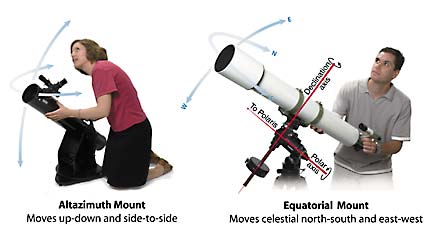
A telescope on an altazimuth mount, like this popular Dobsonian design, simply moves up-down and left-right. An equatorial mount's north-south and east-west motions make it easier to follow the moving stars as the Earth turns, and can also help you get oriented when using a star chart at the eyepiece.
Sky & Telescope diagram
If you have an equatorial mount, find its polar axis (the rotating part that's closer to the telescope's base; it may have a setting circle showing right ascension). Outdoors, place the telescope so the polar axis points roughly to where you know Polaris, the North Star, will be located after dark. The telescope's motion around this axis now traces the paths taken by celestial bodies across the sky as the Earth turns.
Sweep the telescope around its polar axis from the eastern horizon across the sky to the west to visualize the paths the stars will follow over the course of a night. The mount's motions may seem awkward and unpredictable at first. But remember that no matter where the telescope is pointed, it will move only toward or away from Polaris (celestial north-south) and at right angles to this direction (celestial east-west). The orientation of these two directions varies in different parts of the sky, but with some practice swinging the telescope around in daytime you'll get used to them.
The Fine Art of Observing
The challenge of astronomy is that we must view most of the universe from extremely far away. When you're trying to see something well on Earth, your instinct is to move closer for a better look. But when it comes to stars and galaxies, we're stuck where we are. So, ever since the dawn of telescopic astronomy, the art of observing has been the art of using your eye to the utmost of its ability.
Looking with care. When looking through the telescope, focus and refocus with care. A good observer is always fiddling with the focus, trying to get it just a hair sharper. Many people find it best to keep both eyes open, since squinting strains the working eye. You can cover the "off" eye with one hand or with an inexpensive eye patch, available at drugstores.
Don't expect to see everything an astronomical object has to offer right away. The first look always shows less than comes out with continued scrutiny. This is true whether your subject is a dim galaxy that can hardly be told from the blackness of space, or a hairline feature on the blindingly bright Moon.
Seeing Through the "Seeing." One reason it takes time to see detail is the unsteadiness of the Earth's atmosphere. Celestial objects constantly shimmer and boil when viewed at high power, thanks to weak but ever-present heat waves in the air around and above us. The severity of this shimmering — called the atmospheric seeing — varies from night to night and often from minute to minute.
As you watch an object quiver and churn, unsuspected detail will flicker into view during quick moments of stability when the view sharpens up — only to fade out again before you know it. The skilled observer learns to remember these good moments and ignore the rest. The quality of the atmospheric seeing matters most when viewing bright objects at high power, but it influences the visibility of faint ones too.
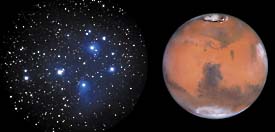
Whether you're viewing open clusters like the Pleiades or subtle surface markings on Mars, you'll have to take time at the eyepiece to see all that you can see. Either way, don't expect your eyepiece views to live up to expectations created by great astrophotographers or the Hubble Space Telescope!
Courtesy Akira Fujii and NASA, respectively
The main reason it takes time to see detail, however, has to do not with the atmosphere but with the eye and mind. Wringing everything possible out of very distant views means learning new visual skills that involve active, concentrated effort. You'll discover that the eye's picture of a difficult object builds up rather slowly. First one detail is noticed and fixed, and you think there's nothing more to be seen. But after a few minutes another detail becomes evident, then another.
To convince yourself of this, look at a piece of sky with the naked eye and try to spot faint stars. Some will be visible right away; others take a few seconds to come out. When no more appear, most people would quit trying. But keep at it for a few minutes. Chances are some more will glimmer into view in places you would have sworn were blank. After a while you're seeing stars that are at least a half magnitude (37 percent) fainter than at first.
The planet Mars provides another classic example of this effect. For the beginner taking a first look with a small telescope, Mars ranks as the most disappointing object in the sky. It's just a tiny, featureless, orange fuzzball. The beginner steps aside to let an experienced Mars observer look in the eyepiece. Silence. "There's the north polar cap. . . . That big dark area in the south must be Mare Erythraeum. Okay, I've got Sinus Meridiani. . . . There's a cloud patch on the western limb. . . . "
The beginner looks again. Nothing but a fuzzball. Well, maybe there is a bit of brightness at the north edge crawling around in the poor seeing, and the fuzziness isn't a perfectly uniform orange, but these hardly seem like things worth noticing. Nevertheless, the next time the beginner looks he or she won't be quite a beginner, and the bright spot and dark area will come into view more readily.
Training Your Eye. An excellent way to train yourself to see better is to make sketches. These don't have to be works of art; the idea is just to record details in your notebook more directly than you can with words. Star fields require no artistic talent whatsoever, but by sketching a field that contains a faint asteroid or outer planet, you can identify the intruder be checking back in the next few days or weeks and seeing which starlike speck of light changes position.
For practice sketching planets, try drawing the Moon with the naked eye. If you have reasonably sharp or well-corrected vision, the Moon shows much more detail to the naked eye than any planet will in a telescope! Make a semicircle a couple of inches in diameter by tracing some round object and then draw the terminator exactly as you see it on the Moon. Carefully add the major dark areas with pencil shading, then look for finer markings. By now you'll be seeing much more detail on the Moon's face than you ever thought possible without optical aid.
Life's Little Comforts
Naturally, this sort of concentration will be spoiled by any undue discomfort or inconvenience at the telescope. You'll need a table right at hand to hold your charts, red flashlight, eyepieces, notebook, pencil, and other gear. I've long used a cheap cardboard card table with fold-up metal legs. It's big, very light, and easy to carry and store. It cost $4 in a secondhand shop.
Nothing ruins your ability to see like having to twist and strain to look through the eyepiece. A rotating tube, which can turn in its cradle to orient the eyepiece where you prefer, is therefore a nice plus in a small reflector and almost mandatory in a large equatorially mounted one. If you can find or make an adjustable-height observing chair, your telescope may start showing new worlds. I've used an assortment of seats, from a milk crate to a stepladder.
Any jerkiness and backlash in your telescope's motions can also spell doom, especially if you lack a clock drive. Make sure your telescope is balanced properly by adjusting any counterweights; it shouldn't move in one direction more easily than in another. Don't be afraid to take a mount apart to lubricate and tighten it, or return it to the manufacturer if it's truly unsatisfactory. The mount I bought for my 6-inch reflector years ago was originally quite jerky. After trying various lubricants, I settled on candle wax rubbed onto all the bearing surfaces. The mount's "clamps" were merely bolts that tightened head-on against the shafts; I epoxied small pieces of leather to the bolt ends, impregnated these with graphite powder and a little oil, and thus gained adjustable tension. The improvement was enormous. At high power I could follow the stars with a smooth, continuous motion just by touching the side of my nose against the eyepiece.
In wintertime, you can either heed the astronomer's standard advice — namely, dress for 20°F to 30°F colder than the actual temperature — or you can learn the hard way. As for the summer, it remains a mystery how successful observations were performed before the invention of mosquito repellent.
In short: Anything that makes your observing easier, surer, or more relaxed, no matter how much trouble it takes beforehand, is worth the effort.

Comments
You must be logged in to post a comment.