 2
2Getting started in DSLR astrophotography has never been easier.
There's no question that digital single-lens reflex cameras (DSLRs) are the most versatile cameras available today. No other device can go from shooting your children’s birthday party in the backyard to recording distant galaxies through a telescope without needing any modifications. DSLRs have truly thrust open the door of astrophotography to anyone with an interest in shooting the night sky.
Michael A. Covington
Several factors make DSLRs good for astronomy. Most of the cameras are designed to use the same lenses as their 35-mm film precursors, and they have relatively large sensors compared to their point-and-shoot counterparts. The common APS-C size CMOS sensors in many consumer DSLRs are about 65% as big as 35-mm film, and about as large as many mid-range astronomical CCD cameras.
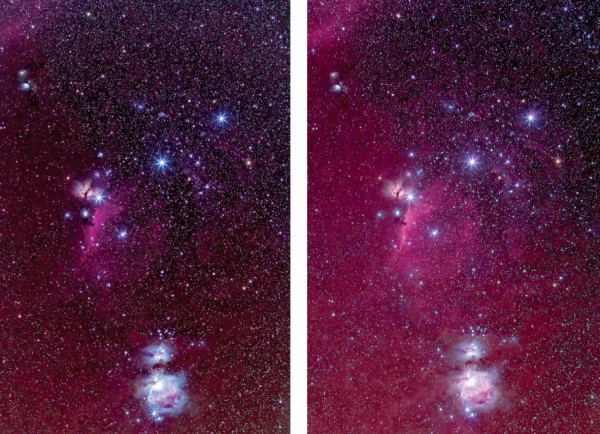
Unlike film, the CMOS sensor in a DSLR has no reciprocity failure; it never forgets a photon. (Well, hardly ever.) A 2-minute exposure is long enough to capture a respectable image of the Orion Nebula. In 10 minutes with a modest telephoto lens, you can record 16th-magnitude stars. And DSLRs don’t require you to bring along a computer when you’re shooting the night sky.
There are many DSLR cameras available for purchase, but Canon manufactures the most popular ones for astrophotography. It is the only DSLR maker that has actively cultivated the astronomy market, at one time even marketing a DSLR specifically for astrophotographers (the 20Da). This model has long since been discontinued, but Canon has incorporated many of its best features useful for astrophotography into current models.
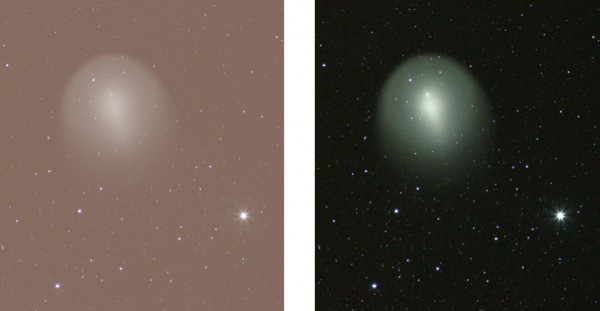
Other DSLRs from Nikon and Pentax are similar, differing mainly in the way functions are accessed and image files are formatted. Virtually all current DSLRs block the astronomically important far-red end of the visible spectrum where hydrogen gas fluoresces. To increase their camera’s red sensitivity, many astrophotographers have had their cameras modified. They remove the camera’s infrared-blocking filter and replace it with a filter that transmits more of the red light from hydrogen emission. Those daring individuals willing to tinker with their cameras can purchase a modified infrared-blocking filter and do the work themselves, or you can send your camera to Hap Griffin (www.hapg.org) or Hutech (www.hutech.com) to have the filter replaced for you. Once the camera is modified, you’ll have to set a custom color balance to shoot pleasing daytime images.
Alan Dyer (2)
If you’re shopping for a new DSLR with astrophotography in mind, one particular feature worth seeking out is known as “Live View.” This feature allows you to turn on the sensor and view a live video on the camera’s rear LCD screen. This makes focusing your lens or telescope a breeze compared to other methods. If you don’t have Live View, you’ll need some form of focusing aid, or you can confirm focus by taking short 5-second exposures and immediately viewing them on the rear screen.
DSLR Astrophotography: Shooting Stars
Once you’ve picked your camera, there are a few additional accessories you’ll need to start shooting the night sky. The first is a device that will let you shoot long exposures without touching the camera. You can make single exposures up to 30 seconds by pressing the shutter release on the camera, and setting a delay so the vibration from pressing the button will have died away before the shutter opens. For longer exposures, you can use a special cable release with a built-in intervalometer. It allows you to program a series of long exposures and eliminates the need for a delay between images. Versatile, inexpensive cable release intervalometers are made by Phottix (www.phottix.com) and other accessory makers, and are easy to find on Amazon.com or ebay.com. Make sure you select the proper model for your particular camera.
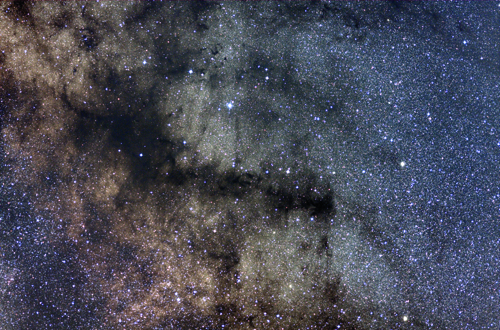
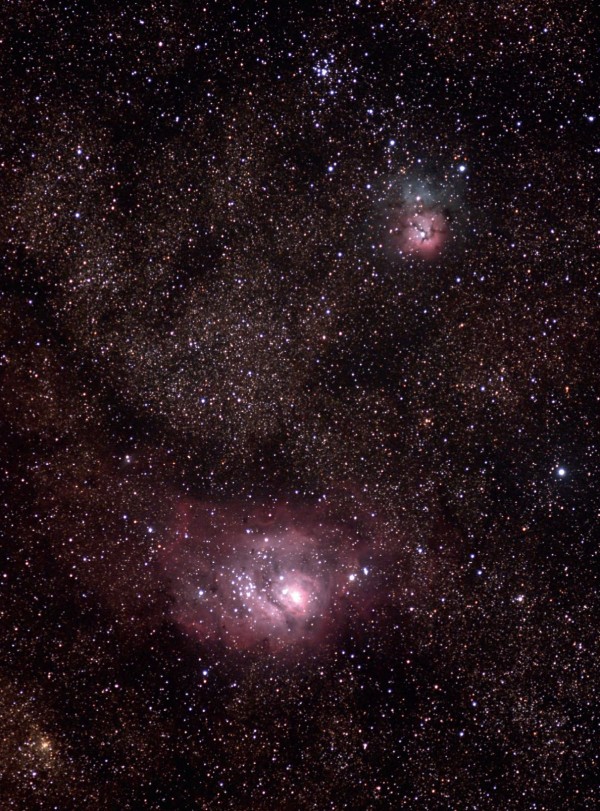
You’ll also want a tripod for your first foray into DSLR astrophotography. Even if your primary goal is to shoot close ups of deep-sky objects through your telescope, shooting simple camera-on-tripod shots will help familiarize you with the functions of your camera that you’ll use for all types of deep-sky DSLR astrophotography. The tripod also comes in handy for shooting conjunctions, wide-field photos of the Milky Way, and meteor showers — popular targets for all astrophotographers.
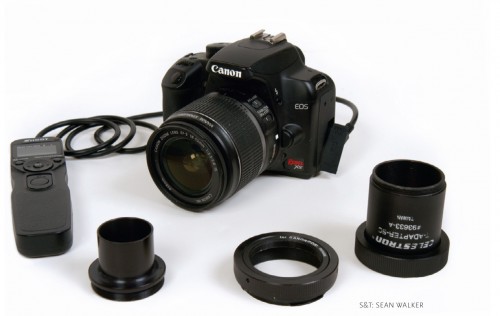
S&T / Sean Walker
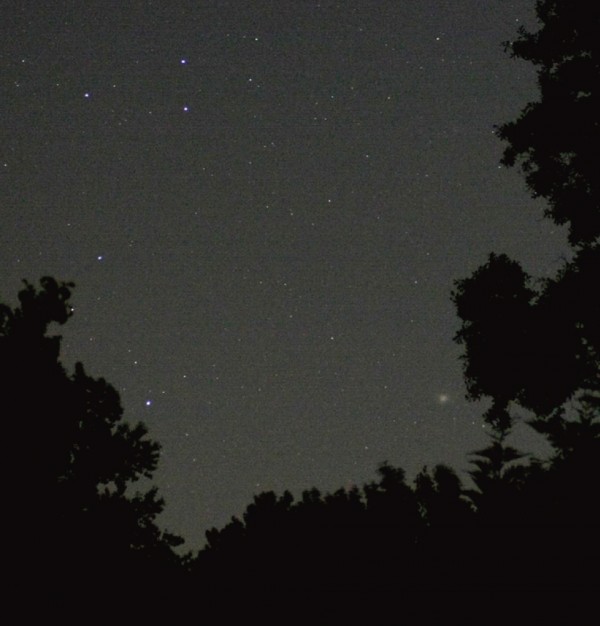
Under a starry, moonless sky, put your camera on your tripod. Use a wide-angle lens at its widest f/stop (lowest f/number) and focus manually on a bright star using live focus, if the feature is available with your camera. Zoom in on the live-focus view to help achieve the sharpest focus. Set the ISO speed to 1600 and expose for 30 seconds. You’ll get a picture that shows plenty of stars and possibly some of the brighter deep-sky objects.
A few nights of practice will familiarize you with your camera’s features that are beneficial for DSLR astrophotography, such as mirror lock-up, noise reduction, and programming sequences of exposures on your intervalometer.
If you long for deeper exposures with round stars, you can “piggyback” your camera on top of your telescope, photographing the sky through your camera lens while using the telescope to track. With this method, you’ll find that the standard 18-55-mm zoom lens that comes bundled with many DSLRs isn’t very good for astronomy; it’s slow (usually no faster than f/4.5) and less sharp than many fixed-focal-length lenses. Also, being a zoom, it may shift focal length or focus as the telescope tilts to track the sky.
Fixed-focal-length lenses are better suited for astrophotography. You can of course buy superb telephoto lenses from Canon, Sigma, and other makers. Here’s a useful tip: adapters are available to convert old manual-focus Olympus, Nikon, Pentax, Contax/Yashica, and screwmount lenses to work on your Canon EOS or Nikon DSLRs. Because autofocus doesn’t work for deep-sky astrophotography, you can use old manual-focus lenses that are much less expensive than the newest lenses on the market. These adapters are available from Fotodiox (www.fotodiox.com).
If you want to try your hand at shooting objects through your telescope, you’ll need an adapter. This usually consists of a T-ring and an adapter that couples your camera to your telescope in place of an eyepiece. With this setup, you can immediately take photographs of the Moon using your telescope as a camera lens. To take pictures of deep-sky objects, you can experiment and make exposures of 5 seconds or more to test how long your telescope mount will track before stars appear as streaks. Even most high-end telescope mounts require an autoguider or other special measures to compensate for errors in the mount’s gears, wind buffeting, or other variations in tracking.
Image Processing
Michael A. Covington
No matter what kind of astrophotography you’re doing, the image that comes out of the camera isn’t usually the finished product. A short, fixed-tripod exposure often appears too dark, while a 2- or 3-minute guided exposure is likely to look too bright because of light pollution. That’s normal. Any automatic white balance in your camera is not usually applicable to deep-sky astrophotos because the subject is too faint for the camera’s computer to make an accurate judgment. You can adjust all of these settings with image-processing software. Although some programs that come with digital cameras offer rudimentary adjustment abilities, I highly recommend acquiring a software program specifically geared toward DSLR astrophotography. These programs are necessary to get the most out of your images.
Some popular programs available for DSLR astrophotography include MaxIm DL, ImagesPlus, Nebulosity, and DeepSkyStacker. Most are available as a trial before purchase, and DeepSkyStacker is freeware.
Once you’ve chosen your processing software, two steps will immediately make your images better. The first is dark-frame calibration. When you take an exposure longer than a few seconds with most DSLRs, you’ll see a random scatter of colored pixels — red, green, and blue specks — indicating places where the sensor has what are known as “hot pixels.”
Michael A. Covington
The best way to get rid of hot pixels is to subtract a dark frame, a picture taken with no light reaching the sensor, but in all other respects just like the original, with the same exposure time, ISO setting, and sensor temperature. The dark frame will have the same hot pixels, so subtracting it from your picture will remove them. Most DSLRs can do this for you automatically if you turn on your camera’s long-exposure noise-reduction function. Then, after you take a long exposure, the camera will immediately take another one just like it with the shutter closed, perform the subtraction automatically, and record the resulting image. Although this feature is handy and guarantees that the dark frame matches all the settings of the original exposure, it takes up precious time that you could be using to record images.
The alternative is to take one or more dark frames manually with the lens cap on and subtract them later with software. Preferably, take several — at least a half dozen — so that software can average them to eliminate random noise. One set of dark frames can serve for pictures of several celestial objects taken on the same evening with the same exposure time and ISO setting.
Michael. A Covington
Besides dark-frame calibration, the second technique that will make your images smoother is to shoot multiple exposures of your target and combine them. This technique, known as stacking, has many advantages. You can get an hour’s exposure without needing an hour of perfect guiding. If you have guiding problems, you can take many exposures and simply toss out the poorly tracked ones. You can also avoid reaching the sky fog limit because no single exposure is excessively long. Stacking algorithms in image-processing programs can automatically discard airplane trails, random hot pixels, and other large discrepancies between the images you are combining. And when you stack multiple exposures, the noise level in the stacked image is reduced proportional to the square root of the number of exposures you combine.
There are limits, of course. You can’t stack 3.6 million 1/1000-second exposures and get the equivalent of an hour-long exposure. The individual exposures have to be long enough for a useful image. That is typically 5 to 10 minutes, unless tracking limitations compel you to go shorter.
Stacking and dark-frame subtraction are also best done with raw files, not JPEGs, because JPEGs have been stretched nonlinearly for display, and data is thrown away in the compression process that makes JPEG files small compared to raw format. After dark-frame calibration and stacking, you can then adjust the brightness, contrast, and color balance of your image and perhaps sharpen it if necessary before saving the final version.
As you improve at recording data, you can learn many additional tricks and techniques to squeeze even more out of your images. But the tips in this article will put you well on your way to DSLR astrophotography while avoiding many pitfalls.
of Digital SLR Astrophotography, which is available at
www.covingtoninnovations.com/dslr.
This article originally appeared in the Sky & Telescope June 2012 issue.


Comments
Joseph-Shuster
August 4, 2015 at 8:42 am
This is an excellent article for engaging new DSLR astrophotographers, but it deserves a side-bar update to mention the Canon and Nikon astronomy-enhanced stock DSLRs.
You must be logged in to post a comment.
August 5, 2017 at 2:24 am
I have just read the article and found some of it overwhelming. About half of it became too hard for me to understand. I did however understand the basics,but I started to lose it when it became technical, eg stacking, processing etc. Thank you for the article but it seems a lot too hard for me. I really need to get together face to face with someone who can teach me the more advanced techniques.
Thank you
Gil Randall.
Australia.
[email protected]
You must be logged in to post a comment.
You must be logged in to post a comment.