 0
0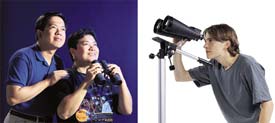
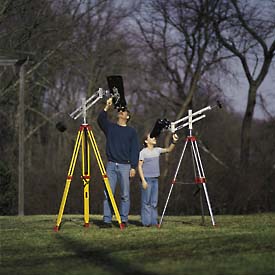
Left: If you're interested in astronomy, you ought to have a pair of binoculars! They make an ideal first 'telescope' because of their wide field of view, ease of use, complete portability, versatility, and low cost. Right: Binoculars — especially large, heavy ones — work best when they are steadied on a mounting. You can use an ordinary camera tripod as shown here, or a specially constructed device.
Sky & Telescope / Chuck Baker
One December evening when I was 14 years old, I was playing with a large magnifying glass and happened to hold it up in line with a Christmas light at the other end of the house. Suddenly the lens was filled with a blinding glare. How could such a dim little light, I wondered, produce such a dazzle? Would it work on an even fainter light — a distant streetlight, say, or a star? I ran out into the cold night to try. The results were disappointing. But my father, who came out to see me holding the magnifying glass up to the stars, suggested I try the family binoculars instead. I did, and the sight that night of Jupiter, the Pleiades, and the Belt of Orion helped start me on an astronomical path that continues to this day.
It seemed so easy! I had never realized that ordinary binoculars could be an astronomical instrument. Like most kids I knew a little astronomy from books. But observing celestial objects first-hand seemed to be something only scientists could do. As I found out in the following weeks, however, a pair of binoculars opens up endless opportunities for serious sky exploring.
Binoculars are the ideal starter instrument because they are so simple to use. You see the image right side up and in front of you. The large field of view makes it easy to find what you point at. Yet binoculars reveal many sights that most people think require a telescope — including craters, mountains, and plains on the Moon, planets and their satellites, the brightest asteroids at favorable times, the occasional comet, countless double and variable stars, dozens of star clusters, and some nebulae and galaxies.
The observing and chart-reading skills you'll gain from searching out these things are the same skills needed to put a telescope to good use. But binoculars are far cheaper as a first investment — not to mention being much more convenient to carry in and out and store in a closet.
In fact, a good pair of binoculars gives as much improvement over the naked-eye view as a good amateur telescope gives over the binoculars. In other words, binoculars get you halfway there — but for a lot less than half the price.
These instruments are so useful and handy, yet so often unappreciated by beginners fixated on the idea of a telescope, that it's worth reviewing some of the things they can do.
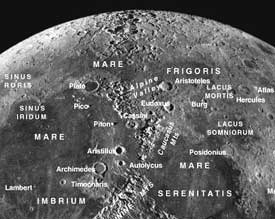
The Moon's major landmarks are easy for binocular users to learn. In addition to the features identified here, scores of smaller details can be seen in even a 5-power instrument.
Sky & Telescope illustration; photo courtesy Lick Observatory.
The Moon
The brightest sights are the easiest to begin with. The Moon shows at least as much detail in binoculars as Galileo saw with his primitive telescopes. The mountains, craters, and plains he discovered in 1609 established that the Moon is an ordinary world, like the Earth, overturning the long-established belief that it was a perfect sphere made of some heavenly substance.
The first glance through binoculars reveals the major dark areas, the so-called seas or maria (plural of the Latin word for sea, mare, pronounced MAH-ray). The maria are flat lava plains. After you spend a few nights outdoors identifying the Moon's features, its geography will begin to grow as familiar as that of the Earth.
When the Moon is a waxing crescent in the western evening sky a couple of days after new, only Mare Crisium is visible. The terminator, the line dividing lunar day and night, moves across the disk to unveil ever more features as the Moon's phase grows to first quarter, gibbous, then full. Night by night more seas are revealed — Mare Tranquillitatis, Serenitatis, Imbrium, and finally Oceanus Procellarum. Near the terminator the slanting sunlight casts long shadows, so here mountains and valleys stand out prominently. They become more easily visible if you brace the binoculars tightly against something to hold them very still.
The Planets
Every month the "Stars and Planets" pages of Sky & Telescope tell where to locate the moving planets.
Mercury can sometimes be located during twilight with the naked eye, but binoculars make it much easier to pick up. Once found, however, this little planet only appears starlike. As with many astronomical objects, the accomplishment lies in finding it at all.
Venus, on the other hand, will show its crescent phase in high-quality, firmly mounted binoculars. In the summer and fall of 1610, Galileo watched Venus change phases in the evening sky. If the traditional Earth-centered idea of the solar system had been correct, with Venus always staying between us and the Sun, Venus would always appear as a crescent. Instead Galileo saw it become gibbous — proving that it circles behind the Sun, thus providing crucial evidence for the Copernican system that would shake European beliefs for the next century. Can you repeat Galileo's observation?
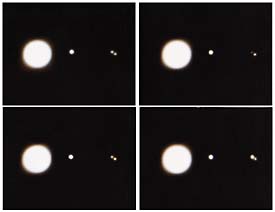
All four of Jupiter's Galilean satellites can be tracked with binoculars. Japanese astrophotographer Akira Fujii captured Jupiter and its moons (from left to right) Ganymede, Europa (being eclipsed), and Callisto.
Mars just looks like a bright orange star. Jupiter, on the other hand, is one of the binocular showpieces of the sky. Its four bright Galilean moons (so named for their discoverer) are lined up on either side of the planet in patterns that change every night. The outer two moons of Jupiter, Ganymede and Callisto, are the most easily seen in binoculars. Europa and Io remain hidden in Jupiter's bright glare until you catch them near their greatest elongation (distance) from the planet. The monthly Jupiter's Satellites diagram in Sky & Telescope can be used to identify the ones you spot. All four are very roughly the size of our own Moon. Comparing these tiny pinpoints with the full Moon itself in binoculars dramatizes how much farther away they are.
A much more difficult achievement is finding Titan, the lone binocular moon of Saturn. This 8th-magnitude speck only gets about as far from Saturn as 6th-magnitude Europa does from Jupiter. It needs large, high-power binoculars on a steady mount (I have seen it this way in 10x50s). Saturn's rings, unfortunately, cannot be seen very definitely with magnifications less than about 20x or 30x.
Uranus, Neptune, and the half dozen or so asteroids that reach 8th magnitude or brighter look like faint stars. Uranus and Neptune can be found in binoculars with the aid of the charts printed in Sky & Telescope each year. Charts for bright asteroids are also printed in the magazine from time to time. To be sure which "star" is the object you're looking for, draw a map of the stars you see near the correct location and watch for the one that moves from night to night. This is the method by which all the major asteroids were originally discovered.
Deep-Sky Objects
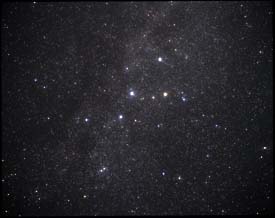
The familiar naked-eye constellation Cassiopeia shows several open star clusters that, with a bit of work, can be seen in binoculars. Just off to Cassiopeia's right, in this photo by Akira Fujii, is the dim blue glow of NGC 7789; click image for blowup.
Courtesy Akira Fujii.
A different kind of reward comes from seeking out the vanishingly faint glows of star clusters and galaxies thousands or millions of light-years away. Merely finding these eerie phosphorescences amid vast expanses of stars is most of the fun. To do this you will need to become handy with sky charts and adept at finding your way through star fields. This is much easier with binoculars than a telescope, so the binoculars are excellent training.
If you have already learned some of the constellations with the naked eye, you'll discover that binoculars show countless new stars in what used to be blank spaces. Sweep from one bright star to another in familiar constellations to get used to finding your way around.
Pay close attention to the size of your field of view; keep in mind how much sky it covers as shown on the map you're using. Locate two bright stars that just fit into the edges of your binoculars' field, and see how many degrees apart they are on your map. You can make a wire ring with this diameter and place it on the map. It will instantly show the binoculars' field of view you can expect. By sliding the ring around on the map, you'll see how much territory you have to cross to get from one place to another.
If your sky is dark and free of light pollution, a pair of 7x50 or 10x50 binoculars should show all stars 9th magnitude and brighter and most deep-sky objects that are described as 8th magnitude or brighter. Objects near this limit will be quite difficult — but that's the challenge! Under typical suburban light pollution, take 1 magnitude off these limits. That still leaves a lot to see.
As with a telescope, making good use of your charts and reference books is crucial to success.
Usage Tips
The biggest problem with binoculars, you'll quickly discover, is holding them steady. The constant dancing of the view prevents you from seeing the faintest objects and the finest detail. As a teenager I followed the moons of Jupiter by holding my binoculars against the side of a tree or wedging them between slats of a fence. Lying on your back and resting their weight on the bones below your eyes will reduce the dancing to a wiggle in time with your heartbeat. A pillow under your head can help.
Today there's a high-tech solution to steady hand-held binocular views — even at higher powers. "Image-stabilized" binoculars use sophisticated electromechanical sensors and actuators to move optical elements inside the binocular to counteract the slight shaking of one's hands. The result? A magically steady view. Image-stabilized binoculars are expensive, but many observers find they're worth it. They do, however, eat batteries. (S&T reviewed a variety of models in the July 2000 and April 2006 issues.)
Large binoculars with 80-mm (or even bigger!) lenses can bring hundreds of deep-sky objects into view, but most observers will require some kind of mechanical support in order to take advantage of their extra light-gathering abilities. Here S&T senior editor Dennis di Cicco and his daughter Hannah demonstrate the use of two binocular mounts from Universal Astronomics.
Sky & Telescope / Rachael Ralby
There are, of course, more conventional ways of steadying the view. Many binoculars can be attached to a photographic tripod with an adapter. This holds them perfectly still for near-horizontal viewing, but you can't get underneath a tripod to look up. A number of special binocular mounts for astronomers are advertised in Sky & Telescope. A half dozen were reviewed in the June 1993 issue, with a further selection in June 2000. These mounts tend to be a bit large and expensive, but the best of them work extremely well.
Short of buying a binocular mount, the usual way of coping with the shakes is to observe from a reclining lawn chair that has arms. By resting both elbows on the chair arms and the eyepieces against your face, the dancing is greatly reduced.
You probably won't be able to set up a tripod over the lawn chair. But if the binoculars are merely attached to a photographic tripod lying across your lap with its legs sticking sideways into the air, the images become much more still. Merely attaching the binoculars to such a large, rigid object is enough to damp down the troublesome rapid jittering. Many amateurs have constructed homemade supports that work well too.
With the glasses held still, their performance will seem at least doubled. Compare the detail visible in solidly mounted 6x30 binoculars (or image-stabilized 10x30s) with hand-held 10x50s.
The comfort provided by the chair is also vital. Some of the most satisfying observations are made at the limit of visibility, where all your powers of concentration are called into play. Any discomfort or strain will interfere with this concentration and blind you to faint detail. This loss is critical. Half of the astronomical objects visible with any instrument — from opera glasses to the Hubble Space Telescope — are within ½ magnitude of the instrument's faint limit. (The reason? By seeing ½ magnitude deeper, you double the volume of space examined.)
Rubber eyecups are also a boon, especially if artificial lights intrude on your observing site.
Charts and notes should be handy, so you can glance back and forth from sky to chart without moving the binoculars. Your lap works fine in a lawn chair, whereas a telescope really requires a separate chart table.
Lastly, start keeping an observing notebook or diary right away — even if you only write down the date, time, observing instrument, and such comments as "Sinus Iridum standing out prominently on Moon's terminator," or "M35 in Gemini a big, dim glow," or "NGC 457 not found." This turns an evening's sightseeing into a permanent collection of observations that will grow in value to you with the passage of time. A plain spiral-bound notebook is ideal for this purpose. The more structured records that some amateurs keep (such as a separate page or file card for each object) are best copied out later, if you want; they are a chore to organize in the dark and constrain your freedom to write down off-the-cuff remarks. It is often these asides — your first bright meteor, an especially clear starry sky after a snowstorm, a night at a memorable site — that often mean the most when you look back on them in years to come.

Comments
You must be logged in to post a comment.