 0
0Perhaps it was a holiday gift. Maybe you bought it on impulse while shopping for something else. Excited, you tried to use your brand-new telescope, but you just couldn’t make it work. Now it sits in your closet, collecting dust.
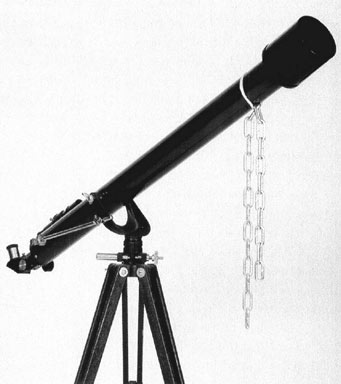
A free-hanging chain is surprisingly good at absorbing vibrations.
S&T
Your dust collector is likely a “department-store” scope, sold through a mass-market outlet for around $100. You would be lucky to get a decent view through most of these scopes at 50×, let alone the 575× advertised on the box. They’re typically wobbly, hard to aim, and difficult to look through. No wonder you’re frustrated!
What can you do about it? Obviously, you could replace the whole thing. But maybe you don’t have enough money for an upgrade. Or perhaps the scope has sentimental value, and you’re determined to make it work. Here’s the good news: a small amount of effort often makes these scopes much easier to use. Besides, tinkering is fun — and you’ve got very little lose.
Before you set to work, try to figure out what your scope’s main defects are. Perhaps it needs only a few minor tweaks to work well. Also think about how much you’re willing to spend. You can probably make the scope a lot sturdier at very low cost, and a substitute finder can be cobbled from scrap material. But you can’t replace the entire set of eyepieces without spending some real money.
Finally, remember that every scope is different — what works for one may not help another. Feel free to experiment, and try out ideas of your own.
Stability Is Key
In most case, the worst feature of a low-end telescope is the mount — the tripod that supports it and the head that holds the tube and lets it point to different parts of the sky. A telescope doesn’t magnify just the things you’re looking at; it also magnifies every wobble and vibration in the mount. Does the view through the eyepiece dance around when the wind picks up? That’s probably because the tripod’s not rigid enough. Do you see wild vibrations every time you touch the focusing knob? The problem might be in the tripod, the head, or both.
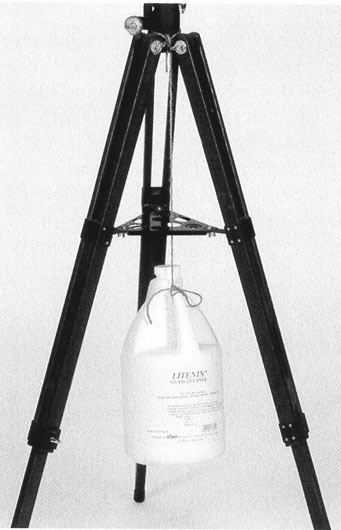
An easy way to improve a tripod's stability is to suspend a weight between its legs.
S&T
To fix a bad case of wobbles, first check the tripod itself:
- Tighten the wing nuts at the top of the tripod, where the legs meet the mount head.
- Shorten the tripod legs as much as you can. The lower the scope, the less it will shake. Try observing from a sitting position — you might even find that you like it better than standing!
- Fill a gallon jug with water or sand and hang it between the tripod’s legs. The extra weight will keep a light mount from swaying in the breeze, and it may help damp vibrations.
- Cut a triangular piece of wood to use as a brace. Wedge it between all three tripod legs just below the mount head.
Extra weight and rigidity always make telescopes less wobbly, but vibration is trickier to analyze and combat. Tap the end of the scope while looking through the eyepiece and time how long the view takes to settle. A couple of seconds is fine, but 10 seconds is way too long. Now try various remedies and see if they reduce the damping time. A few small but measurable improvements add up to a major difference. But be prepared for surprises: some “improvements” may actually make things worse!
Here are some things to try:
- Place the tripod on grass instead of concrete or asphalt.
- Check the tightness of the mount parts, especially any locking screws that hold the scope in position. They shouldn’t be so loose that the scope flops around, but a little slack often helps to dissipate vibrations.
- A square plastic clip from a bread bag can shim space between loose parts.
- If your mount has slow-motion adjustment knobs at the end of long springy cables, they may jiggle in the breeze and impart oscillations to the mount. You can replace them with knobs from your local hardware or electronics store.
- Hang two or three feet of medium-weight chain from the end of the telescope tube. Each link absorbs a little vibration. If tube balance becomes a problem, try one chain in front and a shorter one in back.
Improve Your Aim
An astronomical telescope shows a tiny section of the sky — about as much as you would see when looking through a drinking straw. It’s almost impossible to locate anything in such a tiny field of view without some kind of sighting aid. Many telescopes include a small finderscope that shows a much larger chunk of sky than the main eyepiece (see the Sept/Oct 2004 Night Sky issue, page 69). Unfortunately, the finderscopes sold with cheap telescopes are frequently not up to the task. If you have any doubts about the quality of yours, try it out during the daytime. If you can’t make it work then, you’ll never manage it at night.
Is the view through your finderscope fuzzy? You might be able to refocus it by twisting the front or back lens. But many cheap finderscopes can’t be focused, and some won’t give acceptable images no matter what you do.
To do its job, the finderscope has to point in exactly the same direction as the main telescope. Does your finderscope get knocked out of alignment every time you touch it? You might be able to fix that by tightening the adjustment screws and the bolts that attach it to the telescope tube. A few wraps of tape around the finderscope tube sometimes works wonders.
If your finderscope is more of a trouble than a help, scrap it and try a different kind of finder. Many observers prefer a so-called unit-power finger, which projects either a red dot or a red ring onto a transparent window through which you view the sky. Line the dot or circle up on your target by eye, and you’ll find a magnified view in your eyepiece! You can get one for about $25, either from a telescope store or by mail order from one of the retailers that advertise in our magazine.
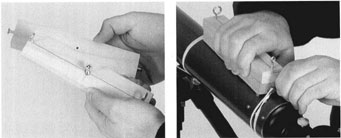
A handmade finderscope (see below for instructions) works quite well.
S & T
If you don’t want to spend that much, you can make your own peep-sight finger. It’s not as accurate as a red-dot finder, but it works beautifully for viewing the Moon or the bright planets, and you can probably build it in 10 minutes out of scraps of wood that are lying around your house.
Eliminate Tunnel Vision
Any astronomer will tell you that the eyepiece is half of the telescope. Yet the eyepieces packed with department store scopes often feature plastic lenses that yield fuzzy images. They may show very narrow fields of view, so you feel as though you’re looking through a tunnel. And sometimes you must place your eye very close to them to see anything at all.
The first step to easy viewing is to ignore the highest-magnification eyepiece packed with your telescope. This is the one with the smallest focal length (the number printed on the barrel). Low-cost eyepieces with focal lengths less than 10 mm are typically unusable; they’re included only so that the manufacturer can boast about high magnifications.
The lowest-magnification eyepiece in your set (the one with the longest focal length) is probably the best of the lot, and it should work quite well on the Moon and large star clusters. But if even this eyepiece lets you down, take a deep breath and ponder — you’ll probably need to replace the entire set, which could cost almost as much as a new telescope. (You might be able to salvage a low-power eyepiece from some broken binoculars.)
If you need to buy replacement eyepieces, start by measuring the ones you’ve got. If their barrels are 1.25 inches in diameter, you’re in luck: it’s easy to find better-quality replacements in that size. But many older telescopes require eyepieces with 0.965-inch barrels, which are very hard to find — especially good ones!
There are three possible ways to use 1.25-inch eyepieces in a scope built for 0.965-inch ones. First, some recent models are built to accept both sizes — see if there’s a ring that you can pop out of the eyepiece holder to let it accept wider barrels. If not, consider buying a 0.965-to-1.25 inch adapter tube. These are fairly common commodities, available for about $25 (call around). But be careful: The adapter tube adds at least an inch between the telescope and the eyepiece, and you may not be able to rack your focuser in far enough to compensate for that extra length.
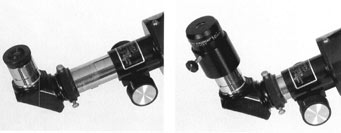
An adapter tube can allow a telescope built for 0.965-inch eyepieces to accept 1.25-inch eyepieces, but only if the focuser can be racked in enough to compensate for the extra length.
S & T
If you have a refracting telescope with a diagonal that lets you look horizontally into the tube when the scope is pointing straight up, you can replace it with a hybrid diagonal (about $35) with a skinny end to fit into 0.965-inch-wide focusers and a fat end that holds 1.25-inch eyepieces.
Now, let’s check out some eyepieces. Many designs are available, but you can’t go wrong with some basic Plössls — they’re excellent all-around eyepieces and a great value starting at around $40 apiece. Kellner eyepieces and their close cousins the modified achromats also provide good views at somewhat lower cost. See Ed Ting’s review in the January/February 2005 print issue (page 73) of Night Sky for other possibilities.
Your “must-have” eyepiece is the one that gives low-power views, about 25 mm in focal length. It will help you navigate with its wide field of view, and it’s great for observing large objects such as star clusters. Then get a high-power eyepiece, perhaps 10 mm in focal length, to observe details on the Moon and planets.
If your budget allows, follow up with a Barlow lens. This device looks like a long tube with a lens at one end. It goes into the focuser before your eyepiece, and using one doubles or triples the magnification. It’s an inexpensive way (around $40) to “double” your eyepiece collection.
If your telescope is a reflector (using mirrors rather than a lens to gather light), there’s another easy way to improve your view. When your reflector’s main mirror is warmer than the surrounding environment, it creates tiny air currents that distort the view, much like looking over hot pavement on a sunny day. You’ll get better results if you set up your scope, then wait at least a half hour for it to adjust to the outdoor temperature. Storing your scope in an unheated garage or shed will minimize the cool-down time.
What Can You Expect to See?
For decades, the makers of department-store scopes have promised you eye-popping views of celestial showpieces. Reality is somewhat different. Most mass-market scopes have small main mirrors or lenses, just a few inches across. That means that they gather only a modest amount of light and can’t provide exceptional views of faint objects, including most nebulae and galaxies.
Keep in mind that no telescope, even a very large one, will give your eye views matching photographs made with time exposures on ultra-sensitive films and digital detectors. In particular, most astronomical objects will appear black and white to your eyes, since they’re far too dim to see with daytime (color) vision.
Your scope may be modest, but don’t let that prevent you from using it! An inexpensive telescope that gets used is superior to a premium scope that sits in storage. Even the smallest scope can provide fine views of the Moon, the planets, and many showcase celestial objects. It can teach you how to get around the sky, provide the thrill of discovery, and foster a lifelong passion for astronomy.
How to Build Your Own Finder
You’ll need two wood strips measuring about 1 by 2 by 6 inches, one wood screw long enough to join those strips, two smaller screws for the ends, and two screw-in eyelets with holes about 1/4 inch across. Small eyelets are most accurate, but bigger eyelets are easier to see through — try putting a smaller one in back and a bigger one up front.
Draw a guideline lengthwise down the center of one strip. This will be the sighting strip. Near each end, drill two pilot holes and screw an eyelet into each.
Stack the sighting strip atop the other piece of wood (the base strip), and fasten them together with the big wood screw. Next insert the other two screws into the ends of the base strip. Attach the finder to the scope tube by wrapping two strong rubber bands around the end screws. (If you don’t trust rubber bands, twine or wire work just as well.)
Center a distant object in your scope’s lowest-power eyepiece. To adjust your finder so that it’s pointing to the same object, pivot the sighting strip with respect to the base strip to move the finder side to side, and screw the eyelets in or out to adjust the view up and down. Position your eye so that the eyelets and the target all appear centered. This may be easier if you stay six inches or more behind the rear eyelet.
Now you can find the Moon, planets, and bright stars by sighting through the eyelets. As always, start with your lowest-power eyepiece. If it’s too dark to see the eyelets, light them up with a red flashlight.
Dissecting Binoculars for Fun and Eyepieces
Salvaging eyepieces from old binoculars can save you money — and be fun.
S & T
Do you own broken binoculars that aren’t worth fixing — but you don’t have the heart to throw them away? They probably have Kellner eyepieces that will work fine in a telescope. A 7x35 binocular eyepiece typically has a 20-mm focal length, while those on 7×50s usually have a 30-mm focal length, to provide a wider field of view. If you don’t already own throw-away binoculars, try a pawn shop.
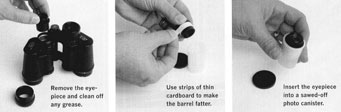
See if the eyepiece can be unscrewed. If not, search around its circumference for small set screws that can be loosened with a jeweler’s screwdriver. After removing the eyepiece, carefully wipe off any lubricant with a clean rag.
Next measure the outer diameter of the eyepiece’s barrel. Many binoculars use 0.965-inch eyepieces, and if that’s the size you need, you’re done. Otherwise, insert the eyepiece into a barrel of the proper size and shim it with cardboard strips for a snug fit. A 35-mm film canister with the bottom cut off fits perfectly into a 1.25-inch focuser. If you need a 0.965-inch barrel, try unscrewing the optics from one of those low-quality eyepieces, or cut up that worthless Barlow lens with a hacksaw.
As president of the San Francisco Amateur Astronomers, Michael Portuesi has assisted countless newcomers to astronomy at the SFAA's monthly telescope clinics.

Comments
You must be logged in to post a comment.