 0
0Improve your deep-sky images with this innovative program.
By Bob Fera in the June 2013 issue of Sky & Telescope
As any experienced astrophotographer, and he or she will tell you that transforming a bunch of noisy sub-exposures into a colorful piece of art is no small feat. The process involves many steps using a variety of software packages, each with its own learning curve. For many imagers, the “art” happens in Adobe Photoshop. But before you can use a tool such as Photoshop to apply your personal touch to an image, your data must first go through a series of decidedly less sexy steps — calibration, alignment, and combination. And while these steps involve limited creative input, they are nonetheless critical to the final look of your picture.
Among the numerous programs for processing CCD data, I prefer CCDWare’s CCDStack 2 (www.ccdware.com) for PCs to calibrate, align, stack, and stretch my images into 16-bit TIFF files that are ready for the final tweaks in Photoshop. The program’s strength lies in its intuitive user interface, as well as some “live” stretching features. CCDStack 2 has worked well for me over the years and should provide you with a solid foundation for developing your own methods.
Image Calibration
Let’s begin by preparing our calibration files. I always record several dark, bias, and flat-field images and combine these into “master” calibration frames to ensure that my final result is as clean as possible. This reduces any spurious artifacts in my calibration frames due to cosmic ray hits or other unwanted signals.
Start by opening the program and select Process/Create Calibration Master/make master Bias. The program will immediately open the last folder you used in CCDStack 2, so you may need to navigate to your calibration files folder. Once there, select all the bias frames that match the temperature you shot of your light frames. The Combine Settings window then opens, and allows you a few different ways to combine your biases into a “master” bias frame. I prefer to use the sigma reject mean method, and change the sigma multiplier to 2, and an iterations limit of 2.
In a few moments, your master bias frame is displayed. Simply save the result as a 16-bit FITS file, and repeat the same process to combine your dark frames by selecting the Process/Create Calibration Master/make master Dark.
Bob Fera
Generating your master flat-field image is also similar, though the program will first ask you if you wish to dark/bias subtract each flat frame. If so, choose the master bias frame you’ve just created, and also the dark frame master that matches your flat-filed image. When you reach the Combine Method dialog, again choose sigma reject mean with a multiplier of 2 and an iteration value of 2. Make sure to repeat this routine for all your flats taken through various filters you shot through. Now that we have our calibration frames ready, let’s tackle our raw data.
Open all of your individual exposures taken through one of your filters (if you use a monochrome camera with color filters). Next, select the pull-down menu Process/Calibrate. The Calibration Manager window opens, which will automatically find your master dark, bias, and flat frames if they were saved to the same folder you were working in previously. If not, click the “Dark Manager” button and navigate to your master frames. Once all of your master frames are selected, simply click the “Apply to all” button at the bottom left and in a minute or so, all of your images in this group will be calibrated. Save each of these calibrated images by selecting File/Save data/ Included in the pull-down menu. A new window will open that allows you to add a suffix to your file title, to avoid overwriting your raw data. Select the 32-bit FIT float file option. Now you can repeat the same steps for each of your other filtered-image groups.
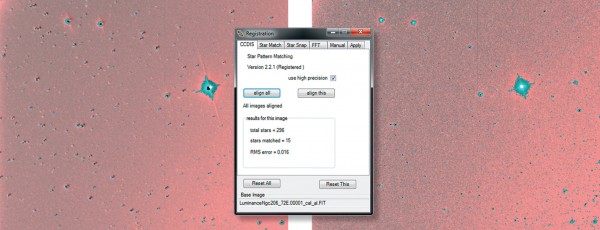
Now that all our images are calibrated, let’s align each frame. If you have plenty of RAM on your computer and a fast processor, you can open all your calibrated exposures and align them all at once. If you have limited memory, you can perform your alignment in groups, but remember to select one image to be the “base” image that all the others will be aligned to. Make sure your alignment frame is the image visible, then select the Stack/Register pull-down menu, and the Registration window opens. CCDStack 2 automatically detects multiple stars in your images, or allows you to select your own points to register if you so choose. Once you’ve selected the alignment points, click the “align all” button at the bottom left, and in a few moments, each of your sub-exposures should be aligned properly. Before applying the alignment permanently, pan through each of your images to make sure each one worked properly. If so, click the Apply tab at the top right. The program offers a few resampling options to compensate for the sub-pixel shifting of each frame. I prefer Bicubic B-spline, but you can experiment to see what works best for your images. After the alignment is applied, save the results with a new suffix.
Bob Fera
Data Rejection
At this point we have all our images calibrated, aligned, and ready to stack. Combining your sub-frames properly will dramatically increase the signal-to-noise ratio of your final image, while eliminating unwanted airplane and satellite trails and other random artifacts. In CCDStack 2 this involves three steps: Normalize, Data Reject, and Combine.
Normalizing your data mathematically compensates for variations in sky background and transparency, scaling all of your open sub-exposures to similar brightness values for corresponding pixels. This step is necessary to produce the best stacked result.
First open all the images taken with a single filter and Select Stack/Normalize/Control/Both. A small window opens that asks you to identify the background sky area. Simply click your mouse and pull a tiny rectangular selection around an area that will be a “neutral” background sky with no bright nebulosity, galaxies, or stars in your selection. For images where nebulosity permeates the entire image, try to find a region with the faintest nebulosity, or a dark nebula, as your background selection. After you’ve made your selection and clicked OK, the program will then ask you to select a highlight area. This will most likely be your main subject, whether it’s a galaxy, nebula, star cluster, or comet. Make a selection around the brightest area and click OK. The Information window pops up and will display the calculated offset for each of your open images.
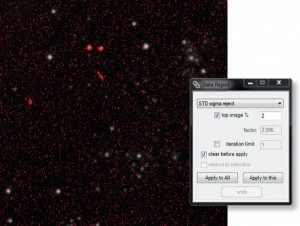
Next, we need to choose which method of data rejection to use. Data rejection identifies and removes undesirable artifacts in each of your individual images, replacing the offending areas in your final stacked result with the corresponding region from multiple unaffected sub-frames.
Choose Stack/Data Reject/Procedures and another new command window opens. Here we’ll select the data rejection algorithm from the pull-down list. I prefer to use the STD sigma reject, but you can experiment again to find what works best for your images. Check the “top image %” box, and set the value to 2, then click the “Apply to All” button. This can take a few moments, but when complete, the program will display all the rejected pixels in each of your sub-exposures as bright red. Now simply close the window and move on to the next step.
Now we’re ready to combine our images into the final stacks. Once again, the program offers a number of ways to do this. Refer to the internal help file to determine which suits your images best. I prefer mean combine, so I’ll select Stack/Combine/Mean from the top pull-down menu. The software will then compute the mean value for each pixel in the stack of sub-exposures, while excluding the rejected pixels. This will give you the maximum signal-to-noise ratio in your final image. When completed, save the resulting image (File/Save Data/This), and again choose 32-bit FITS integer files. Close all files (File/Remove all images), and repeat the same steps for all like-filtered files.
Now we have master FITS files ready to combine into a color image. I prefer to process luminance images separately and then add them to the color result in Photoshop. Before combining any of the stacks, check them over carefully and address any gradients that may be affecting the individual stacks. CCDStack 2 has a gradient removal algorithm that can be found in the pull-down menu Process/Flatten Background, which requires you to click areas in your image until they appear evenly illuminated.
Stretching and Deconvolution
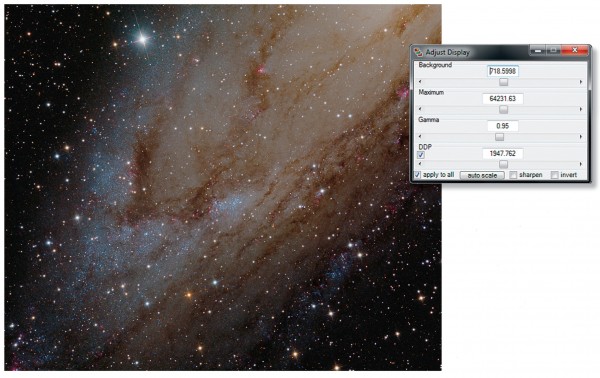
Now let’s stretch our luminance file using the Digital Development Process (DDP) feature. One of the software’s most important features is its ability to do a “live” DDP on the displayed version of your file. First open your master luminance image, and select Window/Adjust Display, opening a window that displays sliders to adjust the Background, Maximum, Gamma, and DDP levels of the displayed image. You can now simply adjust each of the sliders until you’re happy with the displayed result. The lower the DDP value is (when moving the slider to the left), the brighter the image becomes. I suggest keeping the image appearing slightly darker than how you’d like it to eventually look. This performs the bulk of the required stretching, but still leaves room for final tweaks in Photoshop. Once you get the image looking the way you want it, lower the Background value by around 50 points to avoid clipping the black level in your final image. Apply the display settings to your image with the pull-down option File/Save scaled data/This, and select TIFF 16 bit.
Bob Fera
You can also sharpen your image using deconvolution to tighten up the stars and sharpen small-scale features. CCDStack 2 has an excellent deconvolution routine called Positive Constraint that, when applied moderately, does a great job without introducing unwanted artifacts such as dark halos around stars. Select Process/Deconvolve. A new window opens, and a number of stars will appear with yellow + symbols over them. These are stars the program has selected to measure their point-spread function (PSF) to determine the strength of the deconvolution algorithm. You can also double-click on any stars you want the program to include in its calculations. Choose stars that are not saturated and are well defined (i.e. not embedded in nebulosity or within a visible galaxy). Next, select Positive Constraint at the bottom of the window, and set the number of iterations; I often use 30 to 50. Now click the “Deconvolve” button, and in a few minutes the process is complete; save the resulting FITS file. You can apply the same DDP settings to the deconvolved image as you did to the original by switching to the unprocessed version and clicking on “Apply to all” in the Display Manager window. Save the deconvolved version as a scaled 16-bit TIFF to be combined with the color image later in Photoshop.
Color Combine
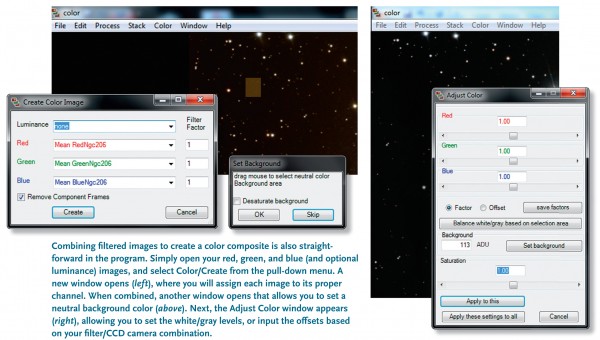
Finally, let’s combine our red, green, and blue files into an RGB image. In order to accomplish this best, you first need to know the correct RGB ratios for your particular CCD camera, filters, and sky conditions when the images were recorded. Although there are several ways to measure these values once for your system, each data set also requires adjustments to be made for atmospheric extinction caused by the target’s altitude when each series of color sub-exposures was taken. I prefer the free software eXcalibrator (http://bf-astro.com/excalibrator/excalibrator.htm) for determining an accurate color balance (see www.skypub.com/excalibrator). However, a simple method to get you started with approximate color balance in CCDStack 2 is to normalize your red, green, and blue files to one another, and then combine the images at a 1:1:1 ratio. As described earlier, select a neutral background area, then the highlights. After normalization, select Color/Create from the pull-down menu. The Create Color Imagewindow opens, where you can assign your filtered images to their respective channels. You can also incorporate your master luminance image here if desired, though make sure not to include the stretched luminance image. Click the “Create” button, and in a moment your combined color image will appear.
Immediately a small window called Set Background appears with your color file. If your image requires additional color adjustment, simply drag a box around a neutral background area and click “OK.” You can perform additional background and highlight corrections using the Color/Adjust command in the pull-down menu.
Bob Fera
When you’re happy with the overall color image, you can stretch the result using the DDP slider and save the result for further adjustments in Photoshop, and include the stretched luminance image.
Performing these steps correctly provides a solid foundation upon which you can build and modify once you become familiar with all the tools available in CCDStack 2. Using the software’s sigma-based data-rejection algorithms, live DDP, and a mild application of Positive Constraint deconvolution will give you a head start on your way to producing images that may one day appear in Sky & Telescope.
 Bob Fera shoots the night sky from his backyard observatory under the dark skies of Northern California.

Comments
You must be logged in to post a comment.