 0
0Here’s an easy technique for creating expansive images of the Sun and Moon using modest sensors.
By Tim Jensen in the September 2013 issue of Sky & Telescope
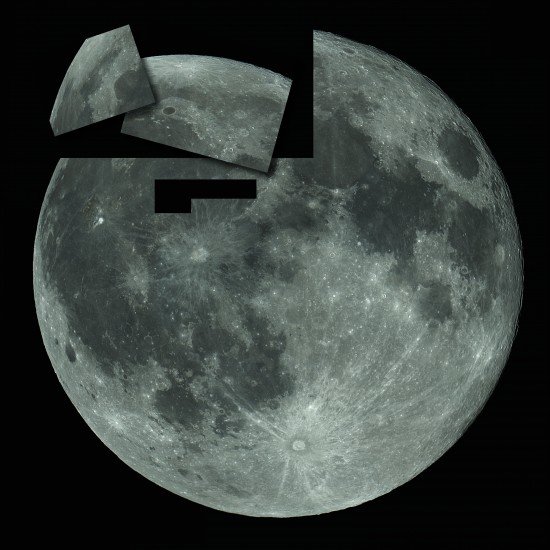
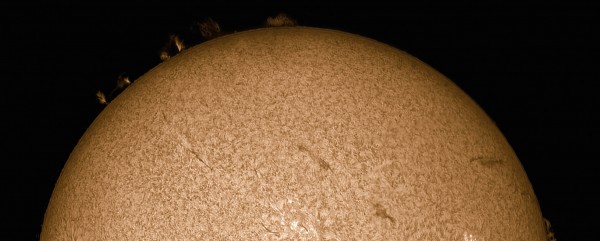
Planetary imagers dream of shooting high-resolution photos rife with small-scale detail. Swirling clouds within Jupiter’s Great Red Spot, or the enigmatic Encke Gap at the edge of Saturn’s ring system, are two trophies we often search for when presented with a high-resolution planetary image. But capturing the same level of detail on full-disk images of the Sun and Moon requires a different approach. By the time you squeeze the entire object down to fit onto the modest detectors in today’s planetary cameras, all that lovely detail is gone. The solution to this problem is to shoot multi-panel mosaics.
The advantage of making high-resolution mosaics is that the tiny details of your narrow field of view will be preserved in a final result. The drawback is that you have to take lots of images or videos and stitch them together to appear as one continuous image. Fortunately, there’s a handy feature in recent versions of Adobe Photoshop CS that can make this stitching almost completely automated.
Are you dreaming of getting into astrophotography? Check out our FREE astrophotography ebook, with all the tips and techniques you need to get started.
A Good Plan
Whether you’re shooting the Sun through a 40-mm Personal Solar Telescope or lunar close-ups through a large reflector, plan your approach ahead of time to avoid gaps in your image. Few things are more disappointing than discovering when processing your images hours later that you missed a section of your target! Take the time to roughly calculate how many frames you’ll have to record to completely cover the Sun or Moon with your particular setup. I suggest about a 50% overlap between each of your frames to ensure success. This should give Photoshop plenty of features to match between segments. When including the limb of your subject, position it so that it fills about ¾ of the field of view.
Also consider whether you’ll be shooting with a polar-aligned mount or simply in alt-azimuth mode. Shooting your target with an aligned mount will allow you to shoot your mosaic tiles sequentially in right ascension and declination, ensuring you don’t miss any regions in your final mosaic. This is still possible to do on an alt-azimuth mount, but keep in mind that your subject will appear to rotate as it arcs across the sky during your recordings.
The type of camera you use to shoot your mosaic is inconsequential to your final result, though the best lunar and solar images today are recorded using high-speed video cameras. These videos are then processed using specialized programs that combine the sharpest frames to produce a single image. Recent digital SLR camera models also allow you to record high-definition video that can be processed in the same way.
Once you’ve made your plans and are ready to shoot, choose a well-defined feature to establish focus, such as a distinct lunar crater at one end of the terminator or a dark sunspot. Take your time to sharpen the focus as much as possible. I often sweep through the telescope’s focal point on the video screen a few times before I’m ready to record.
Finally, establish your exposure settings. The solar atmosphere and lunar surface present a wide range of brightness values, so some areas may be unavoidably overexposed, such as solar flares in the chromosphere or bright craters. Choose a region of your subject that is neither extremely bright nor dark as your mid-range value. Don’t change these settings once you begin recording; keeping them constant will give each overlapping frame the same brightness and tonality, and you’ll avoid visible seams between each tile.
Once you begin recording your videos, make sure to capture an adequate amount of frames to guarantee you have plenty of sharp ones to stack. This can vary depending on your seeing conditions. I often record 2 to 3,000 frames per video to ensure a sharp result.
When moving from one mosaic section to the next, pick a feature that is about one-third of the way in from the edge you are slewing toward and move it until it’s one-third of the way from the opposite edge.
Calibration Is Key
The biggest key to making an outstanding solar or lunar mosaic is recording a good flat-field calibration frame. Flat-field images record any optical defects in your system, such as dust motes or vignetting in your optical system. This calibration image is then divided into your raw image to cancel out these defects. Most planetary imagers skip this step when shooting close-ups of the planets because their target only covers a portion of the imaging chip, so dust motes or vignetting may be inconsequential to their final result. But when shooting lunar and solar mosaics, these defects need to be corrected to ensure a seamless result.
Tim Jensen
For flats to work properly, you need to shoot them with the exact same camera rotation and focus position as your mosaic tiles, so it’s often easiest to shoot your mosaic tiles first, then record your calibration frames.
Shooting flat-field images for a lunar mosaic is exactly like capturing deep-sky flats. Simply point your scope at an area of the twilight sky that is fairly evenly illuminated and collect some video frames that give a well-lit, but not saturated, field of view. Most advanced video cameras and DSLRs have an option to display a histogram of the image being recorded. Try to expose your flat so the brightest areas peak at roughly 50% of the histogram. Once you’re ready, simply record a video of a few hundred frames that you will then stack into your flat-field image.
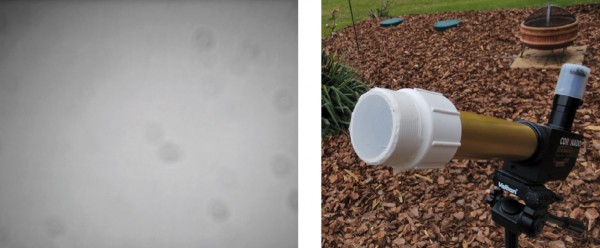
Making a flat for solar hydrogen-alpha images is a bit trickier. It’s nearly impossible to find a light source strong enough to shoot a flat through a solar filter. My solution is to use the Sun itself. By placing a diffuser in front of my telescope’s objective, I can blur out details to create good flat-field images. You can use any white material as a diffuser as long as it’s uniform and isn’t completely opaque. A white garbage bag stretched taught over a plastic pipe large enough to fit over your telescope’s objective makes a great diffuser that you can use whenever necessary. To use the diffuser, aim at a bland area of the chromosphere and place the diffuser over the telescope’s objective. Then simply adjust your exposure as described earlier. The additional benefit to using a diffusing cap is that you can switch between shooting flats and lights in seconds.
Putting It All together
Once that you’ve recorded all your videos and calibration frames, the next step is to stack each video to create the mosaic tiles. I prefer to use AviStack 2 (www.avistack.de) to stack my videos, though all planetary-image processing programs have the ability to apply flat-field calibration frames. You may want to refer to your program’s help section to read up on creating flat-field images, but each use a similar process — stack your flat-field video and save the result in the program’s preferred format. Then load the flat-field image into the calibration section of your preferred program. Now simply stack each of your mosaic videos with this flat loaded and it will be applied properly.
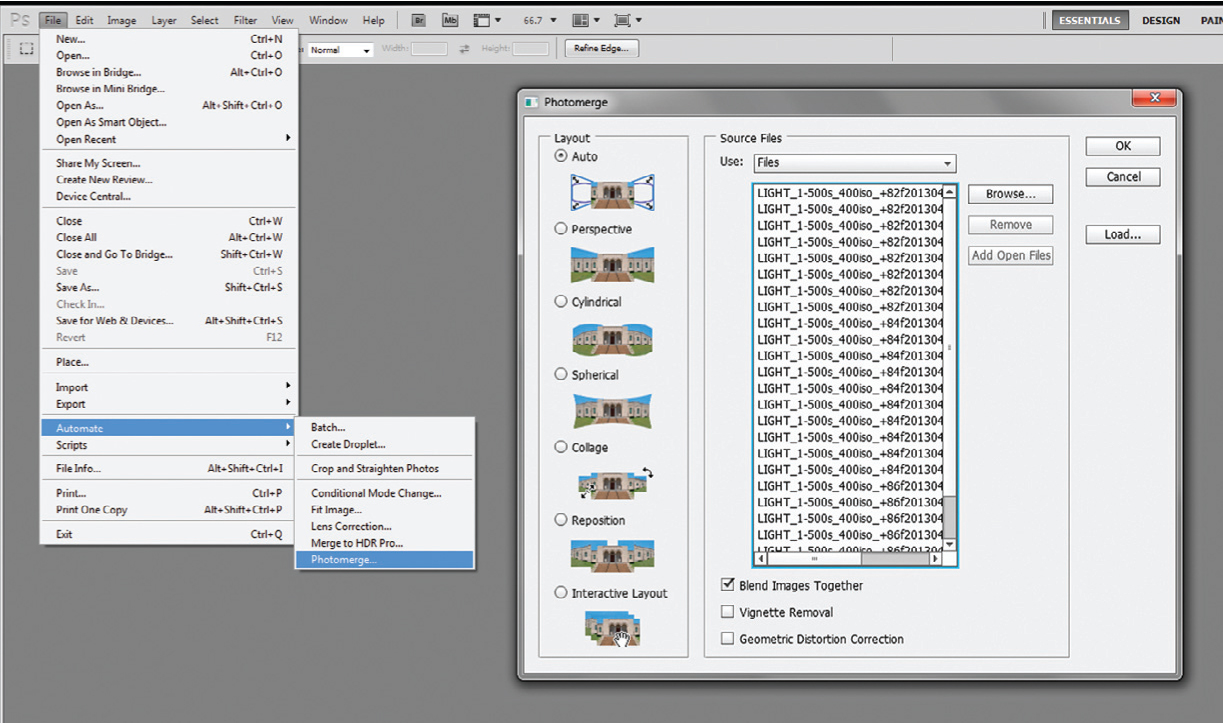
When you’ve completed the stacking process, combining the resulting mosaic tiles is extremely easy using the Photomerge function in Photoshop CS3 or higher. Simply open the program and select File / Automate / Photomerge from the pull-down menu. A dialog window opens that first asks you to choose the files or a folder where your mosaic tiles reside. Click the Browse button and navigate to your images. Once you’ve located the mosaic tiles, select them all by clicking the first image at top, hold the shift key, and click the last image on the bottom.
Next, select the “Auto” button in the Layout column. Make sure the Blend Images Together box is checked, hit “OK,” and let Photoshop run its magic. The program will align each image and organize them on a different layer, then create masks to blend them into the final mosaic. This can take several minutes and when it’s done, you’ll have a full mosaic image on the screen. If you had enough overlap between each tile, there should be no gaps visible in the final mosaic.
Tim Jensen
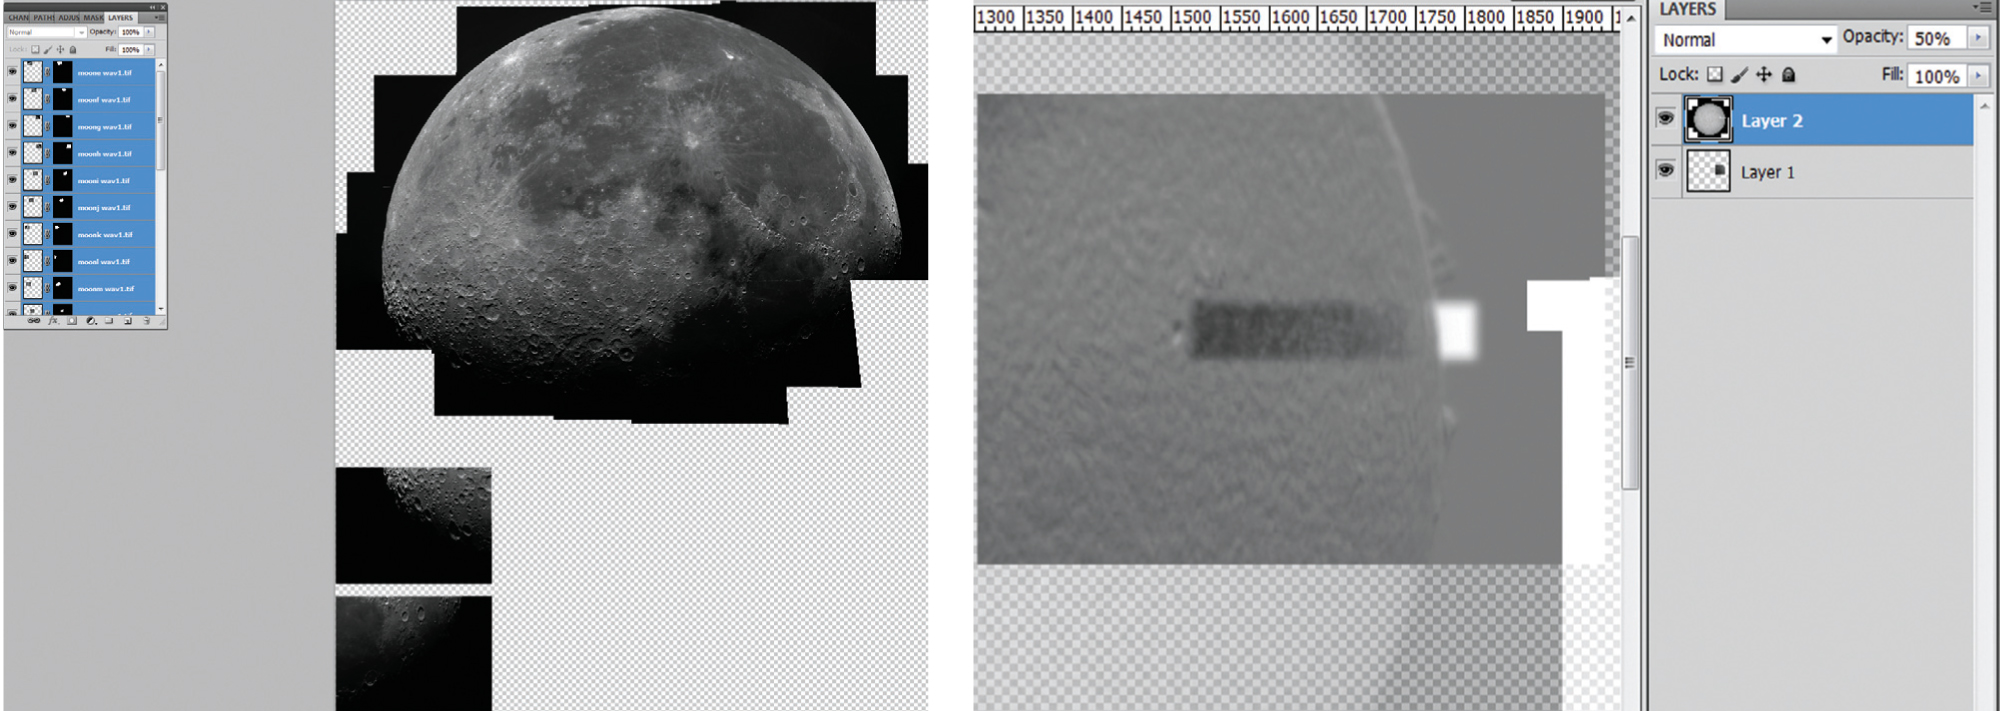
Occasionally, Photomerge does not recognize where a frame should be placed, and leaves it out of the mosaic. If that happens, you can manually insert the frame where it belongs. Open the missing frame, choose Select / All from the pull-down menu, then click your mosaic image and select Edit / Paste. The missing tile will appear in the middle of your mosaic. Select the Move Tool from the tools palette and drag the layer into roughly the proper position. You can then fine-tune the layer’s position by opening the Layers window (Window / Layers) and changing the layer blending mode to Difference. At that point, simply move the layer into its final position with your keyboard’s arrow keys. If the new tile is slightly rotated to the mosaic, you can adjust this by selecting Edit / Transform / Rotate. The layer will appear almost black when aligned. Once you’ve aligned this layer, change the blending mode back to Normal and select Layer / Flatten Image. At this point you can sharpen your result, adjust the color, or do any additional processing you’d usually do to create your high-resolution solar or lunar photos.
Tim Jensen
Once you’ve mastered these simple steps, creating large mosaics is a fun way to create full-disk, high-resolution images of the Sun and Moon. Even if you don’t own a large telescope or multi-megapixel camera, you can still produce gorgeous panoramas of the brightest, most detailed objects in our solar system.
Download Your Free Astrophotography Primer Today!
Learn to photograph the solar system and far beyond! If you're itching to get started astrophotography (or know someone who is), you'll want to download our FREE Astrophotography Primer ebook with some essential and easy-to-follow tips!
 Tim Jensen is an avid astrophotographer and research project
supervisor for Swinburne Astronomy Online.

Comments
You must be logged in to post a comment.