 0
0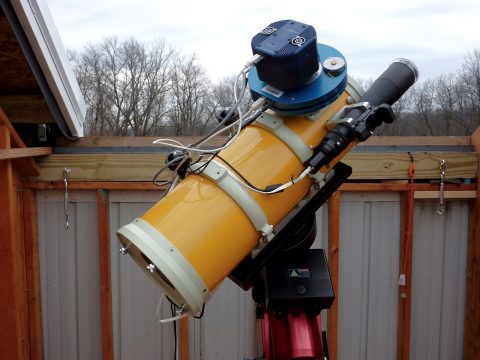
We all do it—ogle over the astrophotographs taken by the masters. The deep-sky images look so exquisite with their masses of detail and perfectly round, pinpoint stars. We know they didn't come easily and that one point of these awe-striking images involves guiding a telescope for imaging.
Impressive celestial photography is a lot more feasible for amateurs now than it was a generation ago. But good results still require a willingness to learn the intricacies of cameras, focusing techniques, exposure times, and miscellaneous equipment. In particular, taking deep-sky pictures requires a skill that's involved in no other kind of photography: guiding a telescope for imaging on a star.
Why Guide?
To get a sharp image from a long exposure, you must keep a guidestar centered on cross hairs for the entire time the shutter is open—from a few minutes to an hour or more. While watching the star, you must often adjust the telescope's aim slightly to keep the star on the crosshairs and the image motionless on the film.
With few exceptions, most telescope drives, no matter how well made, can eliminate the need for guiding a telescope for imaging. Any gear system contains some periodic error that shifts the telescope back and forth slightly in right ascension, typically with a period of 4, 8, or 15 minutes. If the telescope is not perfectly polar aligned it will probably drift slightly in declination too. The telescope tube may flex a little as it tracks the subject across the sky. Atmospheric refraction varies as an object's altitude changes, altering the object's apparent position enough to blur photographs after as little as a few minutes. The electricity running the drive motor may be slightly irregular. And the slowest component of atmospheric "seeing," or turbulence, can make a whole star field creep around slightly with a characteristic time of many seconds. You have to guide the telescope on a star to follow all of these image motions.
The aiming corrections required are so tiny—just a few arcseconds—that you cannot push the telescope by hand. Instead you need an electronic drive corrector that speeds or slows the telescope's drive motor. This allows fine guiding in right ascension (east-west), where the most frequent corrections are needed.
You also need a fine-motion control in declination (north-south). A turn-by-hand control will work only if the mounting is rigid enough so it doesn't wiggle at high power when you turn the knob. An electric declination motor usually gives much better results. Typically the buttons or joystick for controlling both right ascension and declination are mounted on a single hand paddle.
How To: Guiding A Telescope for Imaging
The first thing you need to do is polar align your mount. This means aligning the right-ascension axis parallel to the Earth's axis of rotation. Otherwise, even with perfect guiding a telescope for imaging, everything in the photograph will circle slightly around your guidestar, a problem known as field rotation.
How good a job of polar alignment do you need to do? That depends on the exposure time and image scale of the picture you are taking. Wide-field photography with a normal (50-millimeter) camera lens requires minimal alignment. Simply pointing the mount's polar axis at Polaris as best as you can judge is usually enough for normal-lens exposures of a few minutes.
When you start using longer lenses or a telescope, you need better alignment. Some mounts come with a polar alignment finder, a miniature telescope with an engraved reticle that you position on Polaris and surrounding stars. These devices work quickly and well. If you want the best possible alignment, however, especially for a permanently mounted telescope, use the declination drift method described in the article Accurate Polar Alignment; it takes a little time, but it's simple and needs no special equipment. Nothing else gets you closer to the celestial pole.
Piggyback Photography
The easiest way to enter the realm of guided deep-sky astrophotography is by the piggyback method. Simply attach a camera to the side of the telescope, point skyward, and open the shutter. You guide the camera by tracking on a star seen in the telescope itself.
Piggyback photography puts the least demands on your guiding a telescope for imaging ability. Most piggyback photographers start with a normal or a wide-angle lens (such as 28 mm) that will capture whole constellations at once. Almost any camera lens has a much shorter focal length than the telescope, so the image scale is much smaller. This means you can make numerous small guiding mistakes without affecting the photograph. Piggybacking provides just the type of practice you need to gain experience for other, more difficult forms of astrophotography.
Guiding Eyepieces
What kind of eyepiece do you need for watching the guidestar? For piggyback guiding you might try a plain, extremely-high-power eyepiece with no cross hairs or reticle. Simply keep a bright guide star centered in it as best you can judge.
For photography at longer focal lengths, you need an eyepiece with an illuminated reticle or cross hairs. Dozens of guiding eyepieces are on the market, and many perform other functions as well. What do you really need?
Some people feel that the best design is still the old-fashioned plain cross hairs. Any motion is revealed when the star emerges from behind their intersection. Some astrophotographers like to keep the star in view, tucked in a corner adjacent to the intersection. If you use a double or dual cross hair, the guidestar can be placed at any of the four intersection points or defocused to nearly fill the small central square.
Another approach is to use an eyepiece reticle with concentric circles, each denoting a different guiding tolerance. If you can keep the star inside the appropriate circle, you know that all is well. For this approach to work, however, you have to know the guiding tolerance for your particular photographic setup and which circle on the reticle this corresponds to. Guiding tolerances are usually very tight, so most astrophotographers simply prefer to guide as accurately as they possibly can and hope it's good enough.
One often overlooked approach is the projection reticle. This device superposes a reticle's image onto the view in an ordinary eyepiece. Some designs have a 3x Barlow lens built in to allow the use of medium-power eyepieces that have comfortable eye relief. Another advantage is that the reticle's image can be moved around the field to align on a guidestar; you don't have to move the whole telescope to the star. This allows more flexibility in aiming and composing your photographs.
Reticle illuminators today are a vast improvement over the incandescent bulbs with their tangles of wires that were the rule in the past. Today's standard illuminator is a dim, red LED (light-emitting diode) that draws only a tiny current from a small battery that's right inside the eyepiece unit itself. The brightness should be adjustable so you can set it to the best level for any guidestar. One of the latest and greatest improvements is the blinking LED, which gives you alternate views of the guidestar with and without the cross hairs. This allows much fainter stars to be used for guiding a telescope for imaging.
Through the Telescope
When it comes to deep-sky photography through a telescope, you have two choices: using a separate guidescope or an off-axis guider.
A guidescope attaches to the main telescope via mounting rings that allow it to be aimed independently to some degree. This lets you choose any guidestar up to a couple of degrees from the field being photographed. As a rule of thumb, the guidescope should have about as long a focal length as the telescope you are photographing through. It should also have a reasonably large aperture. Such a guidescope is a substantial instrument in its own right, adding a lot to the whole setup's cost, size, weight, and demands on the mounting.
Guide Scopes have another problem: flexure. During an exposure the guidescope must not bend, shift, or otherwise change orientation with respect to the main telescope's optical axis. Nor can anything in the main telescope bend or shift. Otherwise stars will come out elongated, double, or irregular even when you guide perfectly.
For such reasons the guidescope has been largely eclipsed in the last 20 years by the off-axis guider. This device allows you to look through the main telescope at the same time you're photographing through it.
Off-axis guiders generally use a little "pick-off" prism to divert a small part of the image to the guiding eyepiece. The pick-off prism is near or outside the edge of the camera frame, so its shadow has little or no effect on the photograph. You maneuver the prism around to find a good guidestar before starting the exposure. Alternatively, some guiders use a full-aperture window called a pellicle that transmits most of the light to the film while reflecting 10 or 20 percent to the eyepiece.
At long focal lengths, off-axis guiding a telescope for imaging gives the best results. The starlight you see in the eyepiece goes through the same optical assembly, by and large, as the light going to the film, so tube flexure ceases to be an issue. If it happens you just guide it out.
There are, however, a few inconveniences to consider. Finding a guidestar can be tough, because the area of the field accessible to the pick-off prism is limited. The guiding eyepiece extends out at a 90° angle to the light path of the telescope, and to find a good star you may have to rotate the eyepiece holder around the optical axis to an inconvenient angle. (Some new off-axis guiders allow the eyepiece holder to be rotated independently of the camera.)
Focusing is another consideration. To focus, aim at a bright object, look through the camera's viewfinder, and turn the focus knob until the image seen through the camera is as sharp as you can get it. Leave everything right there. To focus the guiding eyepiece, slide it up or down in its holder; resist the temptation to touch the main focus.
Finally, what you see in an off-axis guider is not exactly what you get. You cannot use a star to guide on a moving comet or asteroid. To track such an object you either have to revert to a guidescope, in which you can track it directly, or calculate the object's expected motion and move your guidestar slowly and steadily at exactly the right speed in the right direction.
Whether you use a guidescope or an off-axis guider, photography through a telescope requires that you work with very high power. The rule of thumb is to use a magnification about five times the telescope's focal length in inches. Thus, with an 8-inch f/10 Schmidt-Cassegrain (focal length 80 inches), try guiding a telescope for imaging at about 400x. In an off-axis guider, a 9- or 12-mm eyepiece with a 2x Barlow lens will always be just about right, no matter what your telescope.
Guiding Technique
Get comfortable, center the guidestar, and take a couple of minutes to practice before opening the shutter.
Astrophotographers generally align their cross hairs north-south and east-west, parallel to the motions of the equatorial mount. This makes it easy to see the corrections to make. However, if you're guiding a telescope for imaging on a faint star you may prefer to orient the cross hairs 45° to these directions. This way, as soon as the star begins to drift it will move into open space rather than remain hidden behind a cross hair.
If you have a four-button hand controller, hold it in the same orientation as east-west and north-south in the eyepiece so you won't have to think about which button to push. If the north-south buttons work right but the east-west buttons are reversed, turn the paddle over to orient them correctly. In this case you'll have to press the buttons from underneath.
Declination drives are notorious for having a little loose play -- a "dead zone" -- where nothing happens for a couple of seconds whenever you reverse direction. A trick that may help a bit with this problem is to unbalance the scope slightly; this way its weight stays hanging on one side of the dead zone. In some cases, however, imbalance just makes the situation worse. Another trick is to set the polar alignment slightly east or west of the true pole. This creates a very slow declination drift, but it will always be in the same direction, so you'll never have to reverse direction and go across the dead zone. Just don't misalign so much that you get field rotation.
In many telescopes, especially commercial Schmidt-Cassegrains, the optics themselves have a certain amount of play. The primary mirror can sometimes make a sudden shift after the telescope crosses the meridian. This "mirror flop" may be so large that you can't guide it out, and you end up with doubled or tailed stars. To keep this from happening, if it proves to be a problem with your scope, start your exposure after the subject has crossed the meridian or finish before it gets there.
Autoguiders
It sounds almost too good to be true: a robotic device that watches the guidestar and adjusts your telescope automatically, with a machine's tireless precision, while you relax or even sleep. It's no pipe dream; this is part of the CCD revolution that swept high-end amateur astronomy at the start of the 21st century. A CCD (charge-coupled device) is a chip that records images electronically and sends them to a computer, which in this case is rigged to drive the right ascension and declination motors. An autoguider can use a modest, low-cost CCD (or CMOS) detector, making this capability affordable at something like the $200 level and up.
Some CCD cameras themselves (as opposed to autoguiders) have a "track and accumulate" function that allows them to take many short exposures, then stack them by computer, finding the best possible fit, to create one long exposure. This reduces and can even sometimes eliminate the need for guiding a telescope for imaging. Some advanced CCD cameras include two CCD chips—a small one to autoguide the telescope and a bigger, better one to record the image.
We've come a long way from the days when amateur astrophotography was limited to fanatical tinkerers who had their own machine shops, darkrooms, and entire nights to spend attempting to make things work. Astroimaging has opened up to anyone willing to buy the gear and take the time to gain skills using it. And now the day has arrived when, once completely set up and running, you can literally sleep through the whole thing!


Comments
You must be logged in to post a comment.