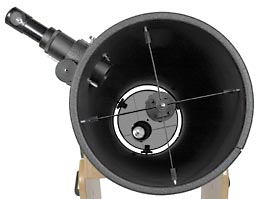
One of the most frequently noted disadvantages attributed to the Newtonian reflector telescope is its need for regular collimation (also know as alignment). However, this supposed disadvantage can be reduced to a minor task if lining up the optical elements is approached logically and methodically.
S&T / Craig Michael Utter
Suppose you have bought a fine guitar with a lovely sound and are learning to play it. But after a while, you notice that it has gone slightly out of tune. What do you do? Learn how to tune it, or trade it in for a piano? Enter the importance of learning how to align your Newtonian reflector telescope.
Your Newtonian reflector will give great images of stars and planets — but only as long as you keep it well tuned. The "tuning" of a telescope is known as collimation. You may have heard that it is incomprehensible, tedious, time-consuming, a pain in the neck, and best avoided. I hope to convince you that it is none of these things. You can master it, and in only a minute or two you'll have your instrument ready for a star performance.
Know Your Newtonian Reflector Telescope
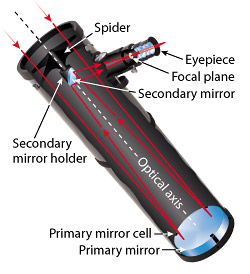
This diagram illustrates the Newtonian reflector's optical components and some of the structures that support them. Aligning and centering these components is necessary for optimal optical performance.
S&T illustration
If you aren't already acquainted with the optical parts of your telescope, now is the time. Here are the components that you will be lining up:
The Primary Mirror
This is the paraboloidal mirror at the bottom of the tube. It has an aluminized surface that reflects starlight to form an image at the focal plane. The important thing to know that it has an axis of symmetry — the optical axis. On this axis, at the focal point, is a "sweet spot" where images of stars and planets are as sharp and crisp as they can be. Outside the sweet spot, an aberration known as coma visibly degrades the image. Coma makes stars appear asymmetric even if the telescope is perfectly focused — the farther the star is from the center of the focal plane, the worse it gets. In particular, this aberration can dramatically reduce the clarity of planetary detail.
Surprisingly, the size of the "sweet spot" depends only on the main mirror's focal ratio (the mirror's focal length divided by its diameter) and not its size. For instance, even a perfect f/4.5 mirror, small or large, can provide "diffraction limited" performance only within a 2-millimeter (0.08-inch) circle at the focal plane. An f/10 paraboloid's sweet spot, by contrast, spans 22 mm (0.87 inch). (For the mathematically inclinded, the sweet spot's diameter is proportional to the cube of the f/ratio.)

The aberration known as coma is enemy number one for Newtonian reflectors — even a perfectly made mirror suffers from it. Shown in these simulated star images (from left to right): a star at focus and centered in the eyepiece (images are coma free), halfway to the edge of the sweet spot (coma will have no visible effect), at the edge of the sweet spot (coma begins to have an effect), at twice the radius of the sweet spot, and four times the radius of the sweet spot.
Nils Olaf Carlin
The primary mirror is held in an adjustable cell designed to support the mirror without deforming it. By adjusting the cell's collimation screws we can fine-tune the mirror's tilt and accurately position the sweet spot where we want it. Because the sweet spot can be very small, this is by far the most critical part of collimation. Have a look at your telescope and make sure you know where these adjustment screws are and how they work.
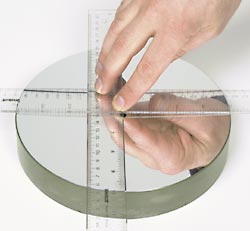
Accurately placing the primary mirror's center dot is an important precursor to accurate collimation. The dot (black electrical tape) is temporarily affixed to the underside of a pair of flexible, transparent rulers mated at right angles to one another. Once the rulers are correctly positioned (with the dot equidistant from the mirror's edge in all four directions), bend them down to attach the tape spot to the mirror.
S&T / Craig Michael Utter
To make collimation easy, the center of the mirror should be marked in some way. I recommend marking it with a piece of electrician's tape. Don't make it too small — a ½-inch-diameter (or even slightly larger) spot works well. As long as it is smaller than your diagonal mirror, it will not affect your telescope's performance. If you plan to use a laser collimator, make a hole in the center of your spot. (Another approach is to use an adhesive binder reinforcement ring, the kind used by generations of school children to keep their homework from flying out of their 3-ring binders.)
The Secondary Mirror
This is a small, flat mirror that serves to move the image formed by the primary to the side of the tube, where it is viewed with an eyepiece. To minimize harmful diffraction effects, the secondary, or diagonal, mirror is generally only large enough to let the central portion of the focal plane receive light from the whole primary mirror. You should center this fully illuminated area in the eyepiece by positioning the secondary in the correct location.
The secondary is attached to an adjustable holder suspended on a spider — often a cross made from thin sheet metal. Identify the adjustment screws for the secondary holder and the spider.
The Eyepiece
The third optical component in the telescope system is the eyepiece. It is a complex magnifying lens used to view the image formed at the focal plane. Like the primary mirror, the eyepiece has an optical axis, and this axis should be aimed at the center of the main mirror for best performance — though in practice it is the center axis of the focuser drawtube that you aim at the primary mirror.

One of the first steps in collimating your reflector is to identify the various components as seen from the focuser. Owing to the multiple reflections, this can seem harder than it really is.
Sky & Telescope illustration
A good eyepiece will render a sharp image in the central parts of the field of view (its sweet spot), but toward the edge not even the best and most expensive eyepieces can produce a perfect image. For this reason it is important to make sure that the sweet spots of the primary mirror and the eyepiece match up — the ultimate goal of collimation.
Now that you know what you're dealing with, look into the empty focuser and try to identify the optical parts just described. This is best done during daylight, with the reflector telescope aimed at the ceiling or the sky (be careful to avoid the Sun). The illustration to the right shows what you should see: the secondary mirror in its holder, its elliptical face tilted 45° and appearing circular. With your eye close to the focuser, you can see the primary mirror reflected in the secondary, and the secondary and its spider in turn reflected in the primary. Finally, inside this reflection of the secondary, you can see the focuser drawtube and your eye.
3 Easy Steps to Align Your Newtonian Reflector Telescope
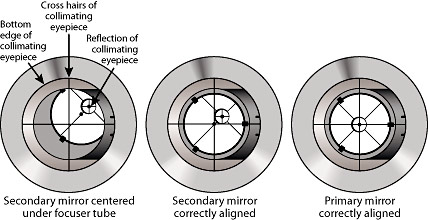
While looking through your collimating eyepiece down your Newtonian reflector's focuser tube, follow these three steps to collimate your reflector. The steps are simple in principle. However, depending on how your telescope is built, you may require a great deal of dexterity — or a partner (especially if your telescope is large) — to manipulate your optics; collimation adjustments are much more easily made with some instruments than others.
S&T illustration
Once you are acquainted with the reflector telescope's optical parts and what they look like in the focuser, you're ready to proceed. To get your telescope well collimated, here is what you need to accomplish:
- Step 1: Center the secondary mirror on the axis of the focuser drawtube.
- Step 2: Aim the eyepiece at the center of the primary mirror.
- Step 3: Center your primary mirror's sweet spot in the eyepiece's field of view.
In most cases, only the last of these three steps will need to be repeated regularly; the first two are more or less set-and-forget operations.
Now let's get to the nuts and bolts of actually collimating your reflector.
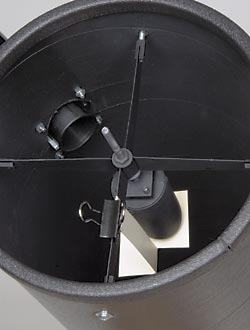
Positioning the secondary mirror can be made much easier if a piece of cardboard is placed between it and the primary mirror. This eliminates the confusing reflections coming from the primary mirror.
S&T / Craig Michael Utter
Step 1: Begin by making sure that the focuser and the secondary are lined up. The simplest and best tool for this step is a sight tube. You slide it into the focuser, as you would an eyepiece, and look through the tube's peephole at the secondary. (If the secondary is far out of adjustment, you should first tilt and/or rotate it to get the reflection of the spot on the primary roughly centered in the sight tube before you proceed.)
It may be difficult to distinguish the edge of the secondary from the reflected edge of the main mirror, so place a piece of white cardboard between the secondary mirror and the primary, as shown here.
The elliptical secondary should appear round and well centered in the circular opening of the sight tube. If it is, Step 1 is done. If not, either the secondary holder or the focuser (or both) needs attention.Try adjusting the secondary holder first. You can usually move it toward or away from the primary by adjusting the center bolt that joins the holder to the spider.
If the error is toward either side of the sight tube (90° to the optical axis), also check to find out if the secondary is well centered in the reflector telescope tube. If it isn't, adjust the spider's mounting screws until it is. If this checks out fine, then tilt the focuser by putting shims under its mounting plate.
Step 2: Here you adjust the tilt of the secondary mirror to aim the focuser's axis at the center of the primary. First, remove the cardboard from the spider. Now, while viewing through the sight tube, carefully adjust the screws that tilt and rotate the secondary until the primary mirror's reflection appears centered in your field of view. If your sight tube has cross hairs, align the primary's center spot with them; otherwise, center the outer edge of the primary within the sight tube. (Make sure that the sight tube is racked in far enough to let you see the whole primary mirror.) A laser collimator is even better for this step — just center the laser beam on the primary's center spot.
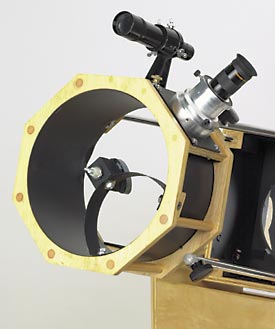
Described in Sky & Telescope's December 2001 issue, Gary Seronik's 8-inch travelscope features several innovations, among them a wooden secondary-mirror support that allows the secondary mirror's collimation to be easily adjusted by hand, without the tiny, hard-to-manipulate screws common to commercial units.
S&T / Craig Michael Utter
A small error in secondary alignment is usually not a problem. As long as the pointing error is no more than 1 or 2 percent of the main mirror's diameter, it makes no visible difference. However, if you plan to use a laser collimator in Step 3, you should be aware that even a tiny misadjustment here will throw off the final collimation.
If you have a truss-tube telescope, you will need to repeat Step 2 each time you reassemble the scope. With a solid-tube reflector, you need only check this once in a while.
Step 3: In this, the final and most critical step, you need to tilt the main mirror to center its sweet spot (and its optical axis) in the focuser. This procedure should be done at the beginning of each observing session and checked occasionally during the night, since temperature changes or routine handling may cause your reflector telescope's components to shift enough to change collimation.
The best tool for this procedure is a Cheshire eyepiece. Put it in the focuser and observe the reflection of its shiny 45°-angle face in the primary. By turning the primary's adjustment screws you can move this reflection until it appears centered on the primary mirror's center spot. If you can make these adjustments while looking in the Cheshire, so much the better; otherwise an assistant can be very helpful. Most mirror cells have three adjustment screws or three pairs of push-pull adjustments. For simplicity's sake, I recommend using only two of the adjustments — the third one (which might as well be the one that is hardest to reach) can be left alone unless you run out of adjustment on one of the others.
When Step 3 is done, the optical axis is accurately centered in the focuser, and collimation is complete. However, if you look carefully you will notice that the Cheshire eyepiece does not appear exactly centered inside the shadow of the secondary. Don't worry; this is in fact how things should look because the secondary mirror is slightly offset. But bear in mind that you needn't master the somewhat elliptical reasoning behind the subject in order to collimate your reflector telescope well!)
A laser collimator is often used for Step 3, by centering the returning beam on the laser's faceplate. However, this method has problems that belie the laser's presumed accuracy. Why?
Suppose that in Step 2 the laser beam has missed the true center of the primary mirror by a small distance, for example, 2 mm. Even if the primary mirror happens to be exactly collimated (its center precisely aligned with the center of the eyepiece), the returning laser beam will be parallel to the main mirror's axis but will miss the center of the laser faceplate by 2 mm. If you then tilt the main mirror to center the beam returning to the laser, the collimation will be 1 mm off!
Unintentionally, you will have caused a miscollimation great enough to affect the performance of a short-focal-length telescope. This extreme sensitivity to a small and otherwise unimportant error in Step 2 is the Achilles' heel of the laser collimator. So even if you use one for rough alignment in Step 3, it is better to use a Cheshire eyepiece for the final adjustment.
Star-Testing Your Collimation
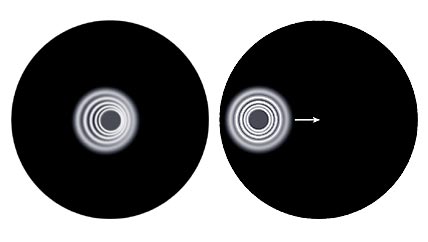
Is your telescope only slightly out of collimation? An out-of-focus star is all that is needed to fine-tune collimation. If the shadow of the secondary mirror is slightly offset (left), the scope could use adjustment. Find the location of the collimated field — the part of the focal plane where the out-of-focus star is symmetric — and adjust the primary mirror's collimation to bring the collimated field into the center of your eyepiece's field of view.
Sky & Telescope
Once your reflector telescope has cooled down and is well-collimated, it should be ready to perform at its best. At high magnification (25× to 50× per inch of aperture, or 1× to 2× per mm of aperture) and in good seeing conditions, stars at focus should appear in the eyepiece as tight, symmetric diffraction disks. However, if stars at the center of the field show the telltale asymmetry of coma, double-check your collimation with the Cheshire eyepiece. If the center spot still looks centered, then it isn't located at the primary's true optical center.
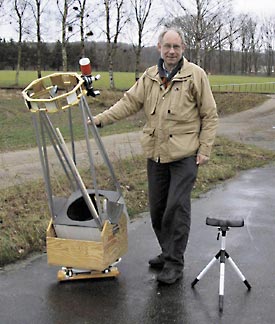
Nils Olof Carlin is seen here with his homebuilt portable 13.1-inch (33-cm) truss-tube Dobsonian reflector. Starting with only the primary mirror, this telescope was Carlin's first telescope-making project — although it has been modified many times.
Nils Olaf Carlin
If this is the case with your mirror's center spot, ignore it for now and try tweaking the primary's collimation, in small steps, until you have centered the best image in the field of view. (This method was described in detail in the June 2001 issue of Sky & Telescope, page 125, and is illustrated below.) The Cheshire will now indicate the location of the primary mirror's true optical center. If necessary, move the spot to the correct position or put another, larger piece of tape on top of it.
If you know that your primary mirror spot is okay (and in most cases it will be, if carefully centered), there is no need to routinely fine-tune your collimation with a star test — the Cheshire eyepiece is not only easier to use, but it is more accurate if the seeing is less than ideal, which it is most nights.
Now your reflector telescope is in perfect tune, and the improvement in performance should be obvious. If not, try to deliberately miscollimate the primary, and see what it does to a high-magnification view of a planet. After this demonstration, you'll never let your scope go out of collimation again.
 4
4


Comments
Dorian
December 1, 2016 at 4:07 pm
I recently bought a new 10" Dobsonian Sky-Watcher reflector. I have a laser Collimator which says the secondary is lined with the doughnut circle on the primary, and the primary is line on the hole of the laser collimator.
The best focus I can acquire is about 60 meters away using a 25mm wide angle lens. That brings in leaves on a tree clear and sharp. Anything beyond that distance isn't possible to focus.
Any help would be appreciated.
You must be logged in to post a comment.
Purlo
December 18, 2016 at 12:15 am
Hello. I have the same telescope and I faced a similar issue when I fist got it. It turned out, you simply have to make sure the truss is 100% extended. In the telescope catalog they tell you to extend the truss until you hear a click. What they don't tell you is that there are two clicks, and you have to keep extending until you get the second one.
If you want to make sure, look at the remaining bit of the truss that is left next to the lower optical tube. That bit should not be longer than 2 inches.
You must be logged in to post a comment.
raliaga
January 2, 2017 at 8:59 pm
Dear Dorian,
My Name is Rafael.
I'm from Atacama desert, north of Chile.
Try removing the first plastic extender 2" on the focuser. Was my first mistake too.
Best Regards.
You must be logged in to post a comment.
Rich
January 15, 2017 at 9:03 am
In general, there are 2 parts to the problem of where the eyepiece needs to be for correct focus for a given object:
1) focal length of telescope
2) distance of object from telescope
For Dobsonians (and Newtonians) the fixed focal length of the telescope is split in 2 parts:
1a) distance from primary mirror to secondary mirror
1b) distance from secondary mirror to eyepiece
2a) Stars can be regarded as infinitely far away. For stars, the eyepiece is at the focal point of the telescope.
2b) For close objects, the eyepiece has to be farther away from the mirror than the focal point. In Dorian's case, if you have something close in focus, you have to move the eyepiece closer to the primary mirror to focus on a star.
It looks like Dorian can't move the eyepiece close enough to the focal point. There may be something in the way (I think that's what Rafael is suggesting). Otherwise, the 1b distance is too short and the 1a distance too long.
You must be logged in to post a comment.
You must be logged in to post a comment.