 2
2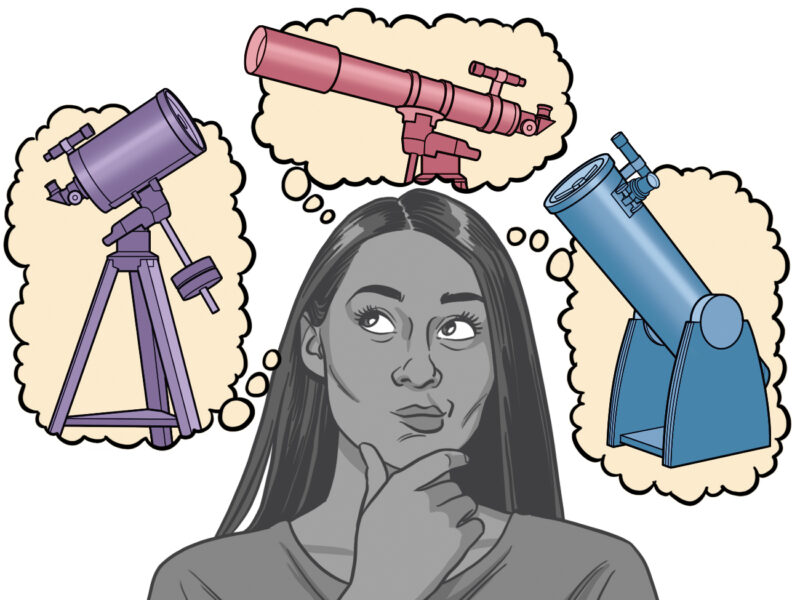
This is an exciting time to become an amateur astronomer. Never before have novice stargazers been presented with such a vast array of telescopes and accessories to pursue their hobby. Naturally, this brings the burden of choice: the bewildering variety makes it hard for an uninformed consumer to make the right decision on what type of telescope to buy.
Whether you're seriously considering buying your first telescope or just daydreaming about it, this guide will help you narrow your options. We'll start by exploring the basic features common to all telescopes, and then look at some specific designs. We'll also look at the tradeoffs, because every instrument has its advantages and disadvantages.
Before you buy anything, you must determine what's important to you. What do you most want to look at? How dark is your sky? How experienced an observer are you? How much are you prepared to spend? Where will you store your telescope, and how much weight are you willing to carry? Answer these key questions, familiarize yourself with what's on the market, and you'll be well on your way to choosing a telescope that will satisfy you for many years to come.
This guide concentrates on visual observing, as opposed to astrophotography. It’s easy to take snapshots of the Moon through any telescope, but long-exposure photos of galaxies and nebulae require lots of time, patience, and specialized equipment. If you’re new to astronomy, it’s smart to gain a thorough grounding in visual astronomy before you contemplate astrophotography. It’s often cheaper to buy one telescope that’s specialized for visual observing and a separate scope for astrophotography than to buy a single scope that is suitable for both jobs.
Before examining the different telescopes available, it's worth knowing the basics of how they work.
Aperture: A Telescope's Most Crucial Specification
The most important aspect of any telescope is its aperture, the diameter of its main optical component, which can be either a lens or a mirror. A scope's aperture determines both its light-gathering ability (how bright the image appears) and its resolving power (how sharp the image appears). Apertures commonly recommended for beginner telescopes range anywhere from 2.8 inches (70 mm) up to 10 inches.
In general, the larger a telescope’s aperture, the more impressive any given object will look. Let’s compare the extremes: Small objects such as planets appear much crisper and more detailed through a 10-inch scope, and faint objects such as galaxies and nebulae appear bolder. That’s hardly surprising considering that the large aperture gathers nearly 13 time more light than one only 2.8 inches across.
Does that mean you should rush out and buy the biggest telescope that you can afford? Not necessarily. Telescopes with big lenses or mirrors tend to be heavy and bulky. That may not be a problem if you keep your scope stored in a shed and wheel it out for use, but a bulky telescope could be a show-stopper if you need to carry it up and down many flights of stairs, want to take it on an airplane, or store it in a cramped apartment.
Although it may be less capable, even the smallest telescope is a huge improvement over your unaided eyes, which have a measly 7 mm (0.28 inch) aperture at best. That means that a little 70-mm scope gathers 100 times as much light as your eyes, revealing amazing detail on the Moon and pleasing views of all the planets, as well as showing hundreds of star clusters, nebulae, and galaxies.
Magnification
When seeing a telescope for the first time, a novice often asks, "How much does it magnify?" The answer is, "Any amount you want." Any telescope can provide an almost infinite range of magnifications, depending on the eyepiece that you use with it.
But don't get the idea that super-high powers will do you much good. Two main factors limit how much power you can use productively with a given instrument: aperture (again) and atmospheric conditions.
Only so much detail exists in the image created by a telescope's main mirror or lens, so you must find the optimum range of magnifications to see this detail — without spreading out the target's precious light too much, making a dim object too dim to see, or turning a bright object into a big blur.
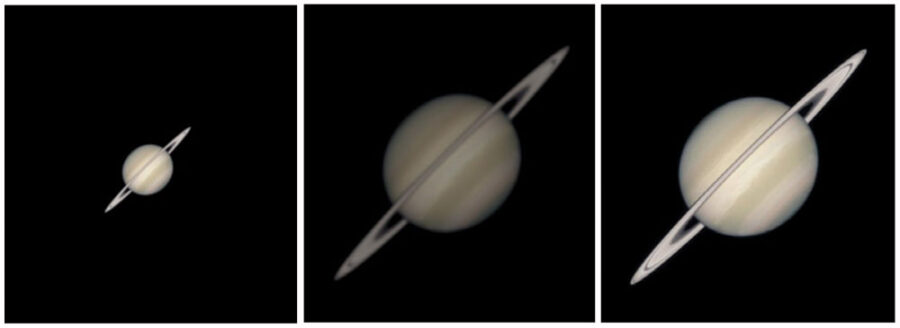
NASA / JPL
How much power is too much? As a good rule of thumb, a telescope’s top useful magnification is 50 times your telescope's aperture in inches, or twice its aperture in millimeters. And that's if the scope has perfect optics and the night air happens to be unusually steady. In other words, a high-quality 4-inch (100-mm) scope should not be pushed much beyond 200×. So if you see a 60-mm department-store telescope scope labeled as delivering "300 power!!!", you'll know it's advertising hype, and you’d be wise to keep shopping.
Joe Renzetti
In practice, the optimum magnification for most objects is somewhere between about 8× and 40× per inch of aperture — toward the low end for most deep-sky objects (star clusters, nebulae, and galaxies) and the high end for the Moon and planets. And deep-sky observers frequently use magnifications of 4× per inch of aperture or even lower to achieve the largest possible field of view. That’s important when viewing huge objects like the Pleiades Cluster and Andromeda Galaxy, or for browsing fields containing multiple galaxies, star clusters, or nebulae.
So the overall range of practical magnifications is roughly 4× to 50× per inch of aperture, with powers between 8× and 40× per inch of aperture being especially useful.
Focal Length and Eyepieces
Now you know the range of useful magnifications for any given instrument. But how do you get them? What do those little numbers on the eyepieces tell you about the magnification they give?
Every scope has a focal length, which is effectively the distance from the main lens or mirror to the image it forms. (This is not always the same as the length of the tube, since, as we'll see later, some telescopes "fold" the light path internally.) Focal length is the large number you'll often see printed or engraved on the front or back of the scope, usually between about 400 and 3,000 millimeters.

Sean Walker / Sky & Telescope
Eyepieces have focal lengths too — 25mm or 10mm, for example . To find the magnification any combination of telescope and eyepiece yields, simply divide the focal length of the scope by that of the eyepiece. For instance, a 1,000-mm focal-length scope, used with a 25-mm eyepiece, delivers 1,000 / 25 = 40 power (or 40×). Switch to an eyepiece with a shorter focal length for higher magnifications: a 10-mm eyepiece used on the same scope delivers 1,000 / 25 = 100×. Notice that it’s only the telescope’s focal length that matters here — the size of its main mirror or lens does not affect the magnification. Our telescope calculator tool offers an easy way to make these calculations.

Sean Walker / Sky & Telescope
A telescope’s focal length divided by its aperture is called its focal ratio, which is conventionally written as “f/” followed by a number. For instance, a 6-inch f/8 telescope has an aperture of 6 inches and a focal ratio of f/8. That means that its focal length is 6×8 = 48 inches, or roughly 1,200 mm. Focal ratios for most mass-market telescopes range from about f/4 to f/15.
For visual observing, the focal ratio determines your choice of eyepieces. To get a telescope’s theoretical maximum 50× per inch of aperture, you use an eyepiece whose focal length in mm is half the focal ratio: 2 mm for an f/4 scope and 7.5 mm for an f/15 scope. To get 4× per inch, the eyepiece’s focal length would be 25 mm for an f/4 scope and 95 mm for an f/15 scope.
Unfortunately, no commercially available eyepiece has a focal length anywhere near 95 mm. That’s because an eyepiece with such a long focal length would be too big to fit into any normal telescope’s focuser tube. So while scopes between f/10 and f/15 generally work very well at the high magnifications needed for planetary observing, they have limited capability to provide the wide-field low-power views treasured by many deep-sky observers.
At the opposite extreme, telescopes with focal ratios of f/4 and f/4.5 can provide great low-power views, but they typically work best with more complex (and therefore expensive) eyepieces, and can be tricky to focus at high power unless the scope is equipped with a precision focuser. Focal ratios between f/5 and f/8 are a nice compromise, easy on eyepieces yet providing decent wide-field capability.
One way to improve a telescope’s wide-field performance is to choose one fitted to accept bigger eyepieces. Almost all modern eyepieces have barrels (the narrow end) either 1¼ or 2 inches in diameter. Budget-priced telescopes usually accept only the smaller size, but most premium-quality scopes accept both sizes. That allows them to use long-focal-length eyepieces that provide low magnifications and wide fields of view.
For an in-depth exploration of this subject, see the article “How to Choose Your Telescope Magnification” by the legendary eyepiece designer Al Nagler.
Why Does the Moon Look Fuzzy?

Richard S. Wright, Jr.
Even with the best telescope, you'll notice that you can discern finer lunar or planetary detail on some nights than on others. Often the sharpness of the view even changes from one second to the next. At high power, you'll see that planets and stars shimmer and blur on most nights. The fault lies not with the scope but with Earth's turbulent atmosphere, and sometimes with very local conditions such as warm air rising from a nearby asphalt driveway that soaked up solar heat all day. Astronomers refer to turbulent nights as having bad "seeing."
Large apertures allow observers to pick out faint objects and fine detail on the Moon and planets, but regardless of aperture, the better the seeing, the better the view. Since steady air is so important, large telescopes — even those in the 10-inch-plus category — are often limited to 250× or 300× on all but the very steadiest nights.
It’s important to have realistic expectations and patience. Most people are familiar with images taken by spacecraft orbiting just above the planets’ surfaces. There’s no way you can possibly see that level of detail across the vastness of interplanetary space while looking through Earth’s thick blanket of image-impairing air.
But don’t despair; any experienced observer will tell you that with practice, you'll see more detail in an image — not only because you become more experienced, but because the longer you look, the better your chance of catching a few moments of unusually steady atmospheric seeing.
Why Can’t I See the Andromeda Galaxy?
Everyone is thrilled by their first view of Saturn and its amazing rings, even when the sky conditions are mediocre. But many people are disappointed by their first view of a galaxy — even a “bright” one. In fact some novices can’t see galaxies at all.
There are three main culprits: unrealistic expectations (again), light pollution, and inexperience.
Any way you slice it, galaxies are faint. Our own Milky Way is a perfect example. Few sights in nature are as beautiful as its soft glow arching across the sky on a clear moonless night far from city lights. It is the stuff of legends, a sight familiar to all humanity before the electric light was invented. Yet it’s estimated that most people in the industrialized world have never seen the Milky Way at all, because for all of its grandeur, our galaxy is very faint. Light pollution near any major city overwhelms the Milky Way’s subtle light.
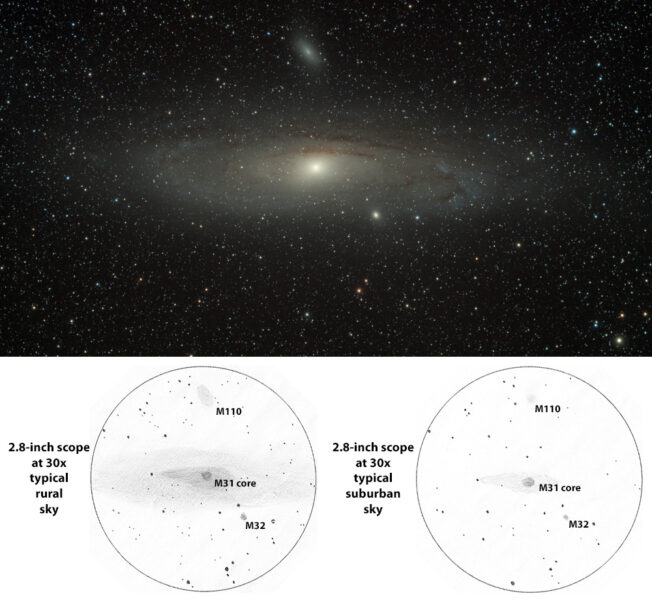
Photograph by Andrei Pleskatsevich, sketches by Tony Flanders.
Telescopes cannot fix that. They make celestial objects appear bigger, but they cannot make their light more intense. If your backyard is too bright for you to see the Milky Way with your unaided eyes, you won’t be able to see the faint, outer regions of any other galaxy either — not even through the world’s biggest telescope. The only part of a galaxy that’s bright enough to shine through heavy light pollution is its small, relatively intense core. (We can’t see the Milky Way’s center because it’s completely blocked from view by clouds of interstellar dust.)
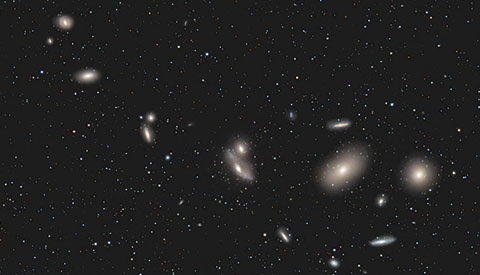
Fortunately for urban and suburban astronomers, many deep-sky objects are bright enough to shine through heavy light pollution, though you may need more aperture to see them than you would from a dark location. These urban-friendly deep-sky objects include star clusters, double stars, and small planetary nebulae.

Wikimedia Commons/Mpyat2
As for galaxies, urbanites still can see their bright centers; in fact even small binoculars can show the core of the Andromeda Galaxy from the middle of a major city. It may not look like much, but remember what you’re seeing: a system of roughly one trillion stars, most presumably orbited by multiple planets, host to anyone’s guess number of sentient species. Its light has traveled across intergalactic space for 2.5 million years. Wouldn’t it be a shame to pass up the opportunity to glimpse it?
Types of Telescopes
Having gained an appreciation of a few important principles governing a telescope's performance, we can now explore the different types available.
You'll be forgiven for thinking there's an infinite variety from the ads in the astronomical press. Yet for all their varied shapes and sizes, telescopes can be divided into three classes: refractors, reflectors, and catadioptrics.
Types of Telescopes: Refractors
SkyWatch
A refractor is the stereotype of how a telescope is supposed to look — a long, gleaming tube with a large lens in front and the eyepiece at the back.
When properly designed and built, refractors generally deliver sharper and brighter images per inch of aperture than any other design. That’s partly because lenses are somewhat more efficient than mirrors and partly because almost all other designs have a secondary mirror up front that blocks some of the incoming light. In general, a top-quality 4-inch refractor shows deep-sky objects about as well as a 5-inch reflector or catadioptric, and might even do a bit better on the planets.
Most telescopes with apertures of 80 mm or less are refractors. That’s because small lenses are easy and cheap to build, and because it’s in those tiny apertures that the refractor’s performance edge matters most. Therefore, refractors dominate both the bottom end of the market, where people can only afford very small apertures and also the market for highly portable high-performance telescopes.
Another advantage of refractors is that they’re generally more rugged than other types of scopes, because their lenses are less likely to come out of alignment. Small refractors also perform to full capacity almost as soon as you bring them outside, whereas large reflectors and catadioptrics deliver mediocre high-power images until their mirrors reach the temperature of the outside air, which can take an hour or more. For these reasons small refractors are well suited to those seeking a "grab and go" instrument or who have no desire to tinker with the optics.
Unfortunately, refractors do not scale up well, for several reasons. The cost of building a good lens rises very steeply as the aperture increases — much more so than for mirrors. That’s why very few amateurs own refractors with apertures greater than 6 inches. By contrast, a 6-inch reflector is considered rather small for a beginner, and many advanced observers own reflectors with mirrors 12 to 30 inches in diameter.
Refractors suffer inherently from false color, which can make a bright star look like a rainbow-tinted blur rather than a point of light if it’s bad enough. False color can be a serious problem for people who want to view the Moon and planetsat high power, but it can be minimized by using either long focal ratios or special glasses.
For achromats, whose lenses are made with traditional flint and crown glass, false color is essentially invisible when the focal ratio is at least three times the aperture in inches. That means that for optimal planetary views a 3-inch achromat needs to be f/9, with a focal length of 3 * 9 = 27 inches. That’s an altogether manageable tube size. But to work equally well at high power a 6-inch achromat would need to be f/18, with a tube 6 * 18 = 108 inches, or 9 feet long!
Long tubes are especially problematic for refractors because the eyepiece is at the bottom of the telescope. That means that the pivot point needs to be above your head, and that in turn requires a tall, heavy, expensive tripod.
In recent years, achromats with focal ratios between f/4 and f/6 have become quite popular. These so-called short-tube achromats sacrifice a certain degree of high-power performance in favor of portability and a wide field of view. They’re not ideal for the Moon and planets, but they’re great for viewing big star clusters like the Pleiades, for browsing wide swaths of the Milky Way, and for viewing terrestrial subjects such as birds and distant ships.
Fortunately, modern technology makes it possible to combine the benefits of short-tube and long-tube refractors — at a price. Apochromats, or APOs, use lenses made with extra-low dispersion (ED) glasses and other materials to reduce false color dramatically. That makes it possible to build a refractor that’s effectively color-free with a short focal ratio. Not only does this alleviate the problem of overlong tubes, it also allows these scopes to deliver gorgeous wide-field views at low magnifications as well as flawless high-power images. APOs are also particularly good for wide-field astrophotography.
Apochromats used to be extremely expensive, but prices have come down significantly in recent years. The cheaper (but still excellent!) models are often marketed as ED refractors rather than as APOs; the distinction is somewhat arbitrary. An ED refractor is now a plausible choice for a beginner who wants a rugged, portable, highly versatile telescope and is willing to accept the limited image brightness and resolution that are inevitable consequences of small aperture.
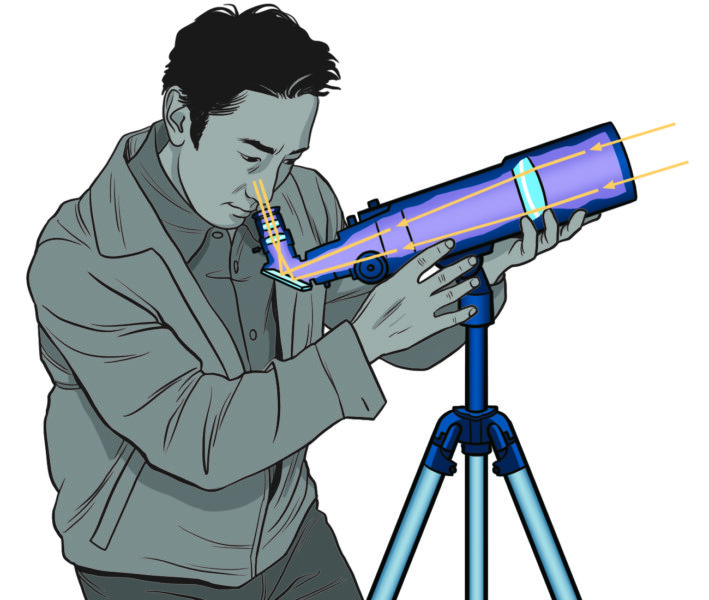
Types of Telescopes: Reflectors
SkyWatch
The second type of telescope, the reflector, uses a mirror to gather and focus light. Its most common form is the Newtonian reflector (invented by Isaac Newton), with a specially curved concave (dish-shaped) primary mirror at the bottom end of the telescope. Near the top, a small, flat, diagonal secondary mirror directs the light from the primary to the side of the tube, where it's met by a conveniently placed eyepiece.
If you want the most aperture for your money, the reflector is the scope for you. When well made and maintained, a reflector can provide sharp, contrasty images of all manner of celestial objects at a small fraction of the cost of an equal-aperture refractor.
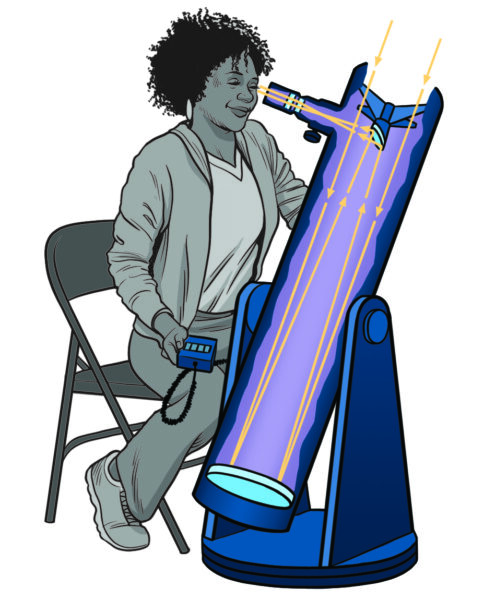
Newtonians have two additional important advantages. They work well at focal ratios from f/4 to f/8, allowing them to deliver wide fields of view relative to their aperture. And the eyepiece is at the top of the tube, meaning that the pivot point is well below your head. That allows them to be used with low tripods or, in the case of the popular Dobsonian design, with no tripod at all. (We’ll discuss Dobsonian mounts next in more detail; suffice to say that they are simple, inexpensive, easy to use, and extremely effective.) In general, a Newtonian on a Dobsonian mount delivers by far the brightest and most detailed images possible per dollar.
SkyWatch / Craig Michael Utter
Newtonians do require occasional maintenance. Unlike a refractor's solidly mounted lens, a reflector's mirrors can get out of alignment and hence need periodic collimation (adjustment) to ensure peak performance, particularly if the telescope is moved frequently. This isn’t a big deal once you get the hang of it. The mirrors of the average Newtonian may not require tweaking for months at a time. But for those not mechanically inclined, having to collimate a Newtonian reflector even occasionally may be frustrating.
Types of Telescopes: Catadioptrics
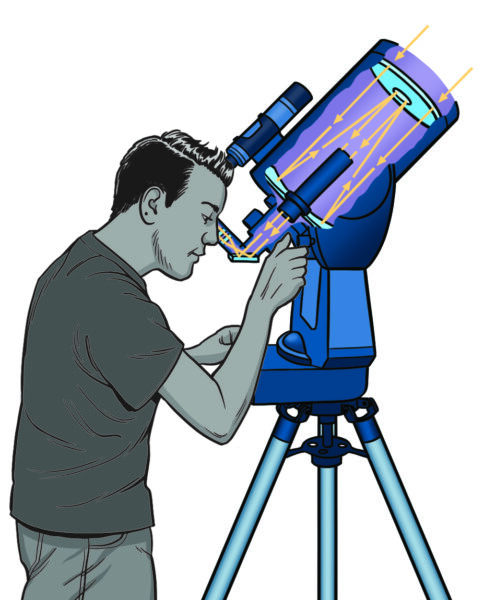
SkyWatch
Then there's the third type of telescope, the catadioptric or compound telescope. These were invented in the 1930s out of a desire to marry the best characteristics of refractors and reflectors: they employ both lenses and mirrors to form an image. The greatest appeal of these instruments is that, in their commonly encountered forms (the Schmidt-Cassegrain and Maksutov-Cassegrain), they are very compact. Their tubes are just two to three times as long as wide, an arrangement allowed by "optical folding" of the light. The smaller tube can use a lighter and thus more manageable mounting. The upshot is that you can obtain a large-aperture, long-focus telescope that's very transportable.
But here too there are caveats. Most Schmidt-Cassegrains have an f/10 focal ratio, and Maksutov-Cassegrains usually have even longer focal ratios. That means that they are unable to produce genuinely wide, low-power fields of view. Some but not all models allow for the addition of a focal reducer to reduce the effective focal ratio to f/6 or thereabouts, which helps considerably.
Like the Newtonian, the Schmidt-Cassegrain telescope needs occasional optical collimation that lessens its appeal to those disinclined to tinker. In terms of cost, aperture for aperture, the catadioptric lies midway between the reflector and the refractor. Like a Newtonian, the popular forms of compound telescopes have a secondary mirror in the light path, and this slightly degrades performance for high-magnification lunar and planetary observing. Even so, when well made, a Schmidt-Cassegrain or Maksutov will deliver very fine images of a wide variety of celestial objects.
If you live in an area where dew occurs (which is almost everywhere), some sort of tube extension is a must to prevent dew from forming on the exposed corrector plate at the front of the tube. Many people in humid climates also use electric dew heaters. Catadioptrics also take longer than any other design to cool down to the temperature of the night air, which is necessary to produce pristine high-power images. So unless you can leave your scope outside to pre-cool, catadioptrics are a poor choice for quick, casual looks at the planets.
Types of Telescope Mounts
Sky & Telescope / Chuck Baker
The best telescope in the world is useless unless it's on a stable, smoothly-working mount that enables you to aim the scope and follow a celestial object smoothly and precisely as the Earth’s rotation moves your target through the scope’s field of view.
Low-quality mounts are by far the most common problem with budget-priced telescopes. That’s especially true of “toy” telescopes sold in department stores, but even reputable vendors often cut costs by packaging perfectly good optical tubes with undersized mounts. That can make observing painful at best and impossible at worst.
In realistic terms, a “stable” mount is one that won’t vibrate for more than a second or so after you rap the tube. In particular, the view shouldn't wiggle so much that when you touch the focus knob that you can’t tell when you’ve found the sharpest image. And when you let go, the aim must not jump to one side.
All telescope mounts fit into a few broad categories. The oldest and simplest design is the manually adjusted altitude-azimuth mount, often referred to as an alt-az. These work like the pan-and-tilt heads on photo tripods, moving the scope up-down (in altitude) and left-right (in azimuth). In fact, robust photo tripods work fine for small telescopes at low and medium magnifications.
If you intend to use a small telescope for casual sky viewing or daytime use (say, birdwatching), you'll find an alt-az mounts preferable because of its simplicity, compactness, and light weight. Alt-az mounts designed for high-power use often have finely threaded slow-motion controls that enable the scope to be moved smoothly by tiny amounts.
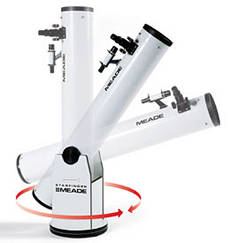
The Dobsonian mount dispenses with the tripod and places the pan-tilt head directly on the ground. Dobsonian mounts are typically built of wood or particleboard, and the large, stable bearings are usually constructed with Teflon. This results in a very sturdy, low-cost mount that (ideally) glides smoothly about both axes with fingertip control. A Newtonian reflector mounted in this fashion is not only extremely easy to set up and use, but very good value, too.
Galileo’s 1610 telescope, which revolutionized astronomy, used an alt-az tabletop mount, designed to be placed on a solid table. Tabletop mounts have made a comeback in recent years; models based on the Dobsonian design are now packaged with many of the best scopes in the sub-$150 price category.
The equatorial mount is basically just an alt-az tilted over so that the azimuth axis (the polar axis) is parallel to Earth’s spin axis and rotates in a plane parallel to the equator rather than the ground. That makes it easy to track celestial objects as they drift across the sky — or more precisely, appear to move as Earth rotates beneath you. All you have to do to keep the scope aimed at your target is turn the polar axis at a rate equal and opposite to Earth’s rotation. This can be done easily with brief twists of a slow-motion knob, or you can equip an equatorial mount with a motor to achieve automatic tracking. Motorized tracking is especially valuable at high power.

Sky & Telescope / Chuck Baker
Equatorial mounts suffer from two main drawbacks. They’re heavier and bulkier than comparable alt-az mounts, and they tend to place the telescope’s eyepiece in awkward positions. Despite that, their tracking capability made them essential for almost all serious amateur telescopes until the advent of the motorized Dobsonian mount and computerized alt-az Go To mount.
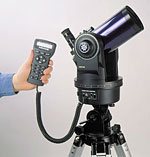
With a Go To mount, you just enter the object’s name, and the mount then looks up its celestial coordinates, calculates where it will appear at a given time and location, and points the telescope to that spot in the sky. That can be a big time-saver, especially in light-polluted settings, where there are few reference stars to aid you in finding the objects yourself. Go To mounts can also follow objects across the sky just by recalculating the position every second or so and making the necessary corrections. That makes it possible to combine the mechanical and ergonomic benefits of alt-az mounts with automatic tracking, something not possible before the computer age.
S&T / Craig Michael Utter
There are a number of cautions to bear in mind when it comes to Go To technology. First, most Go To mounts need to be initialized so that they know the time and location as well as their orientation. Some of the priciest models can do this completely automatically, but most entry-level Go To scopes do the initialization by asking you to point them at specific stars. The process can initially be daunting to beginners unfamiliar with the constellations, but it becomes quick and easy with a bit of practice.
Good Go To mounts aren’t cheap. So if you have a limited budget, you might do better to put all of your money into good optics and a sturdy manual mount rather than diverting half of it to Go To capability. Finally, most Go To mounts require either big batteries or access to the power grid.
Yet another option is Push To technology, which is essentially Go To without motors. Instead of actually moving the scope itself, this style of mount calculates your target’s location and then tells you how to push the scope to reach that spot.
The biggest downside is that you lose automatic tracking; once the scope has located the object, it’s your job to keep it in view. Push To technology is particularly popular for Dobsonians, which are easy for humans to push accurately due to the leverage provided by their long tubes, and relatively hard to motorize for exactly the same reason. Push To scopes are cheaper and lighter than comparable Go To scopes, and they can run for long periods on tiny batteries.
Finders
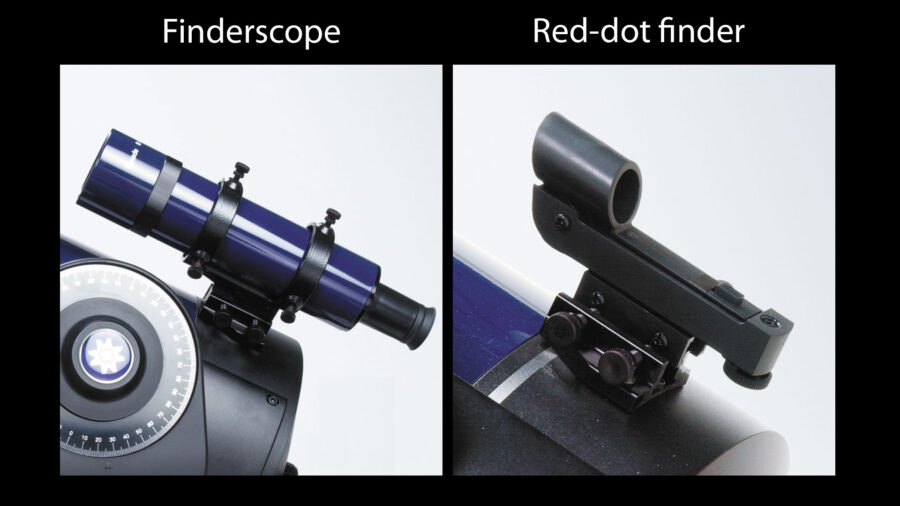
Most telescopes come with some kind of sighting device. The most common types are a low-power finderscope and a red-dot finder.
When used at medium to high power, a telescope shows you only a tiny little bit of sky. This makes aiming at a target a frustrating process unless the scope has some kind of sighting device, or finder.
The traditional solution is a finderscope, a miniature telescope equipped with crosshairs like a gunsight. Two popular alternatives are red-dot finders and red-circle finders, which project patterns onto a transparent window through which you view the sky. Once you align the finder correctly with the main scope, centering an object on the dot, circle, or crosshairs gets it into the main telescope's view.
At the bottom end of the market, beware of 5× finderscopes, most of which have very poor quality. Otherwise, don’t worry too much what finder is packaged with your scope. If you don’t like it, it’s easy to change to a different one at fairly modest cost — or to add another. Many people find the combination of a finderscope and a red-circle finder to be the best of all possible worlds.
Everything Has Its Price
While it may be tempting, resist the urge to buy the cheapest telescope available. Most will be poor quality optically, mechanically, or both, and will disappoint. It’s possible to buy a decent telescope for $150 or less, but only if you shop carefully. And even then, you’ll get a scope with very modest aperture. The cheapest scope that makes no serious compromises would be a 6- or 8-inch Dob, priced anywhere from roughly $300 to $500
On the other hand, even if you have lots of money to spend, don't buy the largest, most expensive telescope you can afford just yet. Start smaller and more manageable. Most serious observers own two or more telescopes for different purposes. It makes sense to start with a cheaper one until you have explored your options and discovered where your long-term interests lie.
Also, be sure to save some of your astro budget for additional eyepieces to expand the scope's magnification range, a detailed sky atlas, good guidebooks, and any number of other accessories. For instance, many people find an adjustable-height chair to be worth its weight in gold.
What Are You Waiting For?
So, is there a perfect telescope out there waiting for you? Yes. As experienced observers are fond of noting, the “best” telescope is the one you use most often. If you heed our advice, you will end up with just such an instrument — one that you’ll be eager to use every clear night.

S&T / Craig Michael Utter
One additional piece of advice: Contact your local astronomy club, which may have observing nights in which you can try various scopes and chat with their owners. Don't be shy. Your local club wouldn't have put itself in our database unless they wanted you to call. And consider subscribing to Sky & Telescope for a monthly dose of observing advice!

Comments
Michaelcaba
November 11, 2021 at 12:41 pm
Excellent article! Thank you.
You must be logged in to post a comment.
suvojit_maity
April 9, 2022 at 12:50 pm
This is so informative valuable article about different aspects of telescope and great as buying guide. Also, there are some embedded useful links. Thanks a lot, Adrian sir.
You must be logged in to post a comment.
You must be logged in to post a comment.